<p>Imagine stepping into your backyard on a sunny afternoon, greeted by the cool shade of a beautifully crafted pergola attached to your house. It’s the perfect spot for a family BBQ, a quiet reading nook, or even a cozy evening gathering with friends. A pergola not only transforms your outdoor space into a functional oasis but also adds charm and value to your home.</p>
<p>Building a pergola attached to the house offers numerous benefits. It enhances your home’s curb appeal, provides much-needed shade, and creates a seamless indoor-outdoor living experience. Plus, it’s a cost-effective way to increase your property’s value—real estate experts estimate that outdoor structures like pergolas can boost home value by 10-15%.</p>
<p>However, the idea of tackling a DIY project like this can feel daunting. Questions about structural safety, permits, and the right materials might hold you back. But don’t worry! This comprehensive guide will walk you through <a href="https://parktimber.co.uk/2026/03/19/how-to-build-a-pergola/"><strong>how to build a pergola attached to the house</strong></a>, step by step. From planning and gathering materials to the final finishing touches, we’ve got you covered.</p>
<p>Ready to roll up your sleeves and get started? Let’s dive in!</p>
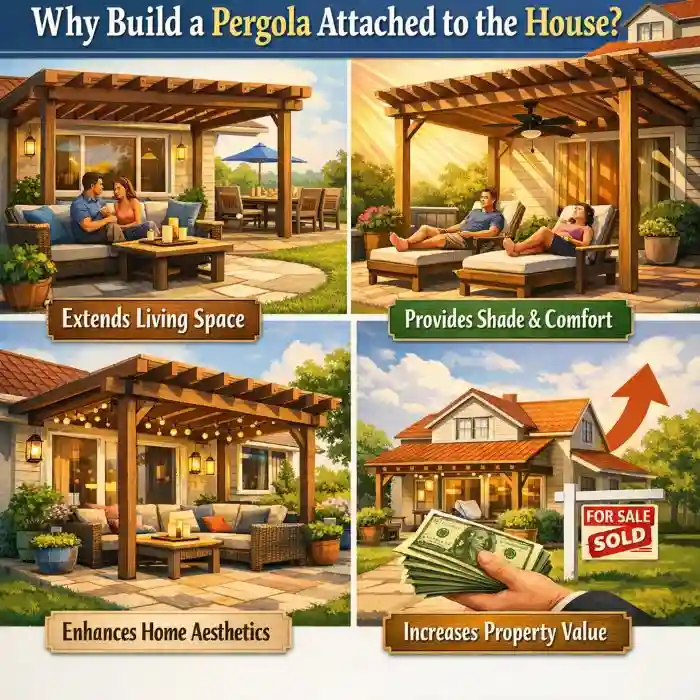
<h2 id="why-build-a-pergola-attached-to-the-house-">Why Build a Pergola Attached to the House?</h2>
<p><img class="aligncenter wp-image-6966 size-full" src="https://comeawayhome.co.uk/wp-content/uploads/2026/05/3dc8c75a-094a-4c0a-abb8-b7c72d7f438ds-ezgif.com-jpg-to-webp-converter.webp" alt="how to build a pergola attached to the house" width="700" height="700" /></p>
<h3 id="advantages-over-freestanding-pergolas">Advantages Over Freestanding Pergolas</h3>
<p>An attached pergola offers several advantages over its freestanding counterpart. First, it integrates seamlessly with your home’s architecture, creating a cohesive look. Since it’s anchored to the <a href="https://comeawayhome.co.uk/how-to-attach-roof-over-deck-from-house/">house</a>, it also provides better shade coverage, especially near doors and windows. This makes it more convenient for everyday use, whether you’re stepping out for a morning coffee or hosting an outdoor dinner.</p>
<h3 id="types-of-attached-pergolas">Types of Attached Pergolas</h3>
<p>There are various styles to choose from, depending on your aesthetic preferences and functional needs:</p>
<ul>
<li><strong>Lean-to Pergola</strong>: A simple design that slopes away from the house, ideal for minimalists.</li>
<li><strong>Gabled Pergola</strong>: Features a pitched roof for a more traditional look.</li>
<li><strong>Curved Pergola</strong>: Adds a touch of elegance with its arched beams.</li>
</ul>
<h3 id="added-value-to-your-home">Added Value to Your Home</h3>
<p>Beyond aesthetics, a pergola can significantly increase your home’s value. According to real estate trends, outdoor structures like pergolas are highly desirable, especially in regions with warm climates. They provide year-round usability, making them a smart investment.</p>
<h2 id="tools-and-materials-needed">Tools and Materials Needed</h2>
<p>Before you begin, it’s essential to gather all the necessary tools and materials. Here’s a detailed breakdown:</p>
<table>
<thead>
<tr>
<th><strong>Category</strong></th>
<th><strong>Items</strong></th>
<th><strong>Purpose</strong></th>
<th><strong>Estimated Cost (PKR)</strong></th>
</tr>
</thead>
<tbody>
<tr>
<td><strong>Tools</strong></td>
<td>Circular saw, drill, level, post hole digger, ladder</td>
<td>Cutting, fastening, ensuring plumb</td>
<td>5,000-10,000</td>
</tr>
<tr>
<td><strong>Materials</strong></td>
<td>4×4 posts (4-6), 2×8 ledger board, 2×6 rafters, lag screws, concrete mix</td>
<td>Structural support, attachment</td>
<td>20,000-40,000</td>
</tr>
<tr>
<td><strong>Fasteners</strong></td>
<td>Joist hangers, galvanized bolts, wood screws</td>
<td>Secure joints</td>
<td>2,000</td>
</tr>
<tr>
<td><strong>Finishing</strong></td>
<td>Wood stain/sealant, retractable canopy (optional)</td>
<td>Weatherproofing</td>
<td>5,000</td>
</tr>
</tbody>
</table>
<h3 id="safety-gear">Safety Gear</h3>
<p>Don’t forget safety gear! Equip yourself with gloves, goggles, and sturdy footwear to ensure a safe working environment.</p>
<h3 id="pro-tip">Pro Tip</h3>
<p>For affordability, source materials locally. Markets like Anarkali in Lahore offer quality supplies at competitive prices.</p>
<h2 id="planning-and-design">Planning and Design</h2>
<h3 id="measure-your-space">Measure Your Space</h3>
<p>Start by measuring the area where you plan to build the pergola. A typical size for an attached pergola is 12×10 feet, with a height of 8-10 feet. Ensure the width aligns with your house wall for a balanced look.</p>
<h3 id="permits-and-approvals">Permits and Approvals</h3>
<p>Check your local building codes. In Lahore, for example, structures over 100 square feet may require approval from the Lahore Development Authority (LDA). It’s better to handle permits upfront to avoid complications later.</p>
<h3 id="design-tips">Design Tips</h3>
<ul>
<li>Use free design tools like SketchUp to visualize your pergola.</li>
<li>Space rafters 12-16 inches apart for optimal shade.</li>
<li>Consider the roof pitch and wind load to ensure durability.</li>
</ul>
<h3 id="common-mistakes-to-avoid">Common Mistakes to Avoid</h3>
<ul>
<li>Overlooking the strength of the house’s rim joist.</li>
<li>Ignoring the slope for water runoff.</li>
<li>Using untreated wood, which can lead to rot.</li>
</ul>
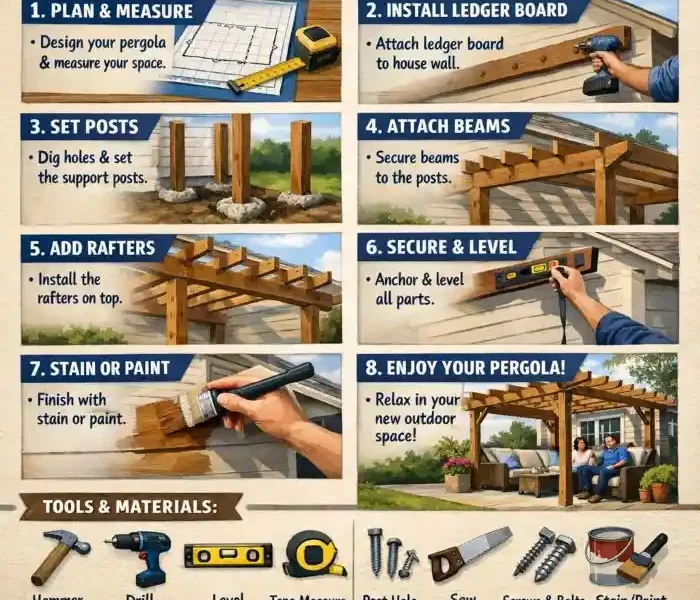
<h2 id="step-by-step-guide-how-to-build-a-pergola-attached-to-the-house">Step-by-Step Guide: How to Build a Pergola Attached to the House</h2>
<h3 id="step-1-mark-and-prepare-the-location">Mark and Prepare the Location</h3>
<p>Clear the area where the pergola will be built. Use a chalk line to mark the outline of the ledger board on the house wall. Ensure the house’s rim joist is strong enough to support the structure.</p>
<h3 id="step-2-install-the-ledger-board">Step 2: Install the Ledger Board</h3>
<p>The ledger board is the backbone of your pergola. Attach a 2×8 board to the house’s rim joist using 1/2-inch lag screws spaced every 16 inches. Flash the top edge with metal to prevent water damage. Use a level to ensure it’s perfectly straight.</p>
<h3 id="step-3-set-the-posts">Set the Posts</h3>
<p>Dig two holes for the front posts, each 3 feet deep and 24 inches in diameter. Pour concrete footings and embed post anchors. Once the concrete sets, secure the 4×4 posts and brace them to keep them plumb.</p>
<h3 id="step-4-attach-beams-and-rafters">Attach Beams and Rafters</h3>
<p>Install double 2×10 beams on top of the posts. Use joist hangers to attach 2×6 rafters to the ledger board. Notch the rafters for a snug fit and space them 12-16 inches apart.</p>
<h3 id="step-5-add-purlins-and-rafter-ends">Add Purlins and Rafter Ends</h3>
<p>For additional shade, install 1×4 purlins perpendicular to the rafters. Angle-cut the rafter ends for a polished look.</p>
<h3 id="step-6-finishing-and-inspection">Step 6: Finishing and Inspection</h3>
<p>Sand the wood to remove splinters and apply a weatherproof stain or sealant. Inspect the structure for stability and make any necessary adjustments. For added charm, consider planting climbing vines like jasmine or bougainvillea.</p>
<h2 id="safety-tips-and-common-mistakes">Safety Tips and Common Mistakes</h2>
<h3 id="safety-tips">Safety Tips</h3>
<ul>
<li>Always use fall protection when working on ladders.</li>
<li>Avoid working with wet concrete to prevent accidents.</li>
<li>Wear safety gear, including gloves and goggles.</li>
</ul>
<h3 id="common-mistakes">Common Mistakes</h3>
<ul>
<li>Poorly attached ledger boards can lead to structural failure.</li>
<li>Uneven posts can make the pergola look lopsided.</li>
<li>Skipping the sealing process can result in wood damage over time.</li>
</ul>
<h2 id="cost-breakdown-and-budget-tips">Cost Breakdown and Budget Tips</h2>
<p>Building a 12×10 ft pergola attached to the house typically costs between PKR 30,000 and 60,000. Here’s how you can save:</p>
<ul>
<li>Opt for DIY instead of hiring professionals, which can cost over PKR 100,000.</li>
<li>Source materials locally to cut costs by up to 20%.</li>
</ul>
<h2 id="maintenance-for-longevity">Maintenance for Longevity</h2>
<p>To keep your pergola in top shape:</p>
<ul>
<li>Apply a fresh coat of sealant annually.</li>
<li>Inspect hardware for rust or wear.</li>
<li>Use retractable shades during monsoon seasons to protect the wood.</li>
</ul>
<h2 id="faqs">FAQs</h2>
<h3 id="how-long-does-it-take-to-build-a-pergola-attached-to-the-house-">How long does it take to build a pergola attached to the house?</h3>
<p>It typically takes 2-3 weekends for a DIY project.</p>
<h3 id="do-i-need-a-permit-in-pakistan-">Do I need a permit in Pakistan?</h3>
<p>Yes, permits are required for attached structures over 10 square meters.</p>
<h3 id="what-type-of-wood-is-best-">What type of wood is best?</h3>
<p>Cedar and pressure-treated pine are excellent choices for durability.</p>
<h2 id="conclusion">Conclusion</h2>
<p>Building a pergola attached to the house is a rewarding DIY project that enhances your outdoor living space and adds value to your home. With the right tools, materials, and guidance, you can create a stunning structure that will be the envy of your neighborhood.</p>
<p>So, what are you waiting for? Grab your tools and start building your dream pergola today! Don’t forget to share your progress and photos—we’d love to see your masterpiece!</p>
<p><a href="https://comeawayhome.co.uk/">House</a></p>
Imagine stepping into your backyard on a sunny afternoon, greeted by the cool shade of a beautifully crafted pergola attached to your house. It’s the perfect spot for a family BBQ, a quiet reading nook, or even a cozy evening gathering with friends. A pergola not only transforms your outdoor space into a functional oasis but also adds charm and value to your home.
Building a pergola attached to the house offers numerous benefits. It enhances your home’s curb appeal, provides much-needed shade, and creates a seamless indoor-outdoor living experience. Plus, it’s a cost-effective way to increase your property’s value—real estate experts estimate that outdoor structures like pergolas can boost home value by 10-15%.
However, the idea of tackling a DIY project like this can feel daunting. Questions about structural safety, permits, and the right materials might hold you back. But don’t worry! This comprehensive guide will walk you through how to build a pergola attached to the house, step by step. From planning and gathering materials to the final finishing touches, we’ve got you covered.
Ready to roll up your sleeves and get started? Let’s dive in!
Why Build a Pergola Attached to the House?
Advantages Over Freestanding Pergolas
An attached pergola offers several advantages over its freestanding counterpart. First, it integrates seamlessly with your home’s architecture, creating a cohesive look. Since it’s anchored to the house, it also provides better shade coverage, especially near doors and windows. This makes it more convenient for everyday use, whether you’re stepping out for a morning coffee or hosting an outdoor dinner.
Types of Attached Pergolas
There are various styles to choose from, depending on your aesthetic preferences and functional needs:
- Lean-to Pergola: A simple design that slopes away from the house, ideal for minimalists.
- Gabled Pergola: Features a pitched roof for a more traditional look.
- Curved Pergola: Adds a touch of elegance with its arched beams.
Added Value to Your Home
Beyond aesthetics, a pergola can significantly increase your home’s value. According to real estate trends, outdoor structures like pergolas are highly desirable, especially in regions with warm climates. They provide year-round usability, making them a smart investment.
Before you begin, it’s essential to gather all the necessary tools and materials. Here’s a detailed breakdown:
| Category |
Items |
Purpose |
Estimated Cost (PKR) |
| Tools |
Circular saw, drill, level, post hole digger, ladder |
Cutting, fastening, ensuring plumb |
5,000-10,000 |
| Materials |
4×4 posts (4-6), 2×8 ledger board, 2×6 rafters, lag screws, concrete mix |
Structural support, attachment |
20,000-40,000 |
| Fasteners |
Joist hangers, galvanized bolts, wood screws |
Secure joints |
2,000 |
| Finishing |
Wood stain/sealant, retractable canopy (optional) |
Weatherproofing |
5,000 |
Safety Gear
Don’t forget safety gear! Equip yourself with gloves, goggles, and sturdy footwear to ensure a safe working environment.
Pro Tip
For affordability, source materials locally. Markets like Anarkali in Lahore offer quality supplies at competitive prices.
Planning and Design
Measure Your Space
Start by measuring the area where you plan to build the pergola. A typical size for an attached pergola is 12×10 feet, with a height of 8-10 feet. Ensure the width aligns with your house wall for a balanced look.
Permits and Approvals
Check your local building codes. In Lahore, for example, structures over 100 square feet may require approval from the Lahore Development Authority (LDA). It’s better to handle permits upfront to avoid complications later.
Design Tips
- Use free design tools like SketchUp to visualize your pergola.
- Space rafters 12-16 inches apart for optimal shade.
- Consider the roof pitch and wind load to ensure durability.
Common Mistakes to Avoid
- Overlooking the strength of the house’s rim joist.
- Ignoring the slope for water runoff.
- Using untreated wood, which can lead to rot.
Step-by-Step Guide: How to Build a Pergola Attached to the House
Mark and Prepare the Location
Clear the area where the pergola will be built. Use a chalk line to mark the outline of the ledger board on the house wall. Ensure the house’s rim joist is strong enough to support the structure.
Step 2: Install the Ledger Board
The ledger board is the backbone of your pergola. Attach a 2×8 board to the house’s rim joist using 1/2-inch lag screws spaced every 16 inches. Flash the top edge with metal to prevent water damage. Use a level to ensure it’s perfectly straight.
Set the Posts
Dig two holes for the front posts, each 3 feet deep and 24 inches in diameter. Pour concrete footings and embed post anchors. Once the concrete sets, secure the 4×4 posts and brace them to keep them plumb.
Attach Beams and Rafters
Install double 2×10 beams on top of the posts. Use joist hangers to attach 2×6 rafters to the ledger board. Notch the rafters for a snug fit and space them 12-16 inches apart.
Add Purlins and Rafter Ends
For additional shade, install 1×4 purlins perpendicular to the rafters. Angle-cut the rafter ends for a polished look.
Step 6: Finishing and Inspection
Sand the wood to remove splinters and apply a weatherproof stain or sealant. Inspect the structure for stability and make any necessary adjustments. For added charm, consider planting climbing vines like jasmine or bougainvillea.
Safety Tips and Common Mistakes
Safety Tips
- Always use fall protection when working on ladders.
- Avoid working with wet concrete to prevent accidents.
- Wear safety gear, including gloves and goggles.
Common Mistakes
- Poorly attached ledger boards can lead to structural failure.
- Uneven posts can make the pergola look lopsided.
- Skipping the sealing process can result in wood damage over time.
Cost Breakdown and Budget Tips
Building a 12×10 ft pergola attached to the house typically costs between PKR 30,000 and 60,000. Here’s how you can save:
- Opt for DIY instead of hiring professionals, which can cost over PKR 100,000.
- Source materials locally to cut costs by up to 20%.
Maintenance for Longevity
To keep your pergola in top shape:
- Apply a fresh coat of sealant annually.
- Inspect hardware for rust or wear.
- Use retractable shades during monsoon seasons to protect the wood.
FAQs
How long does it take to build a pergola attached to the house?
It typically takes 2-3 weekends for a DIY project.
Do I need a permit in Pakistan?
Yes, permits are required for attached structures over 10 square meters.
What type of wood is best?
Cedar and pressure-treated pine are excellent choices for durability.
Conclusion
Building a pergola attached to the house is a rewarding DIY project that enhances your outdoor living space and adds value to your home. With the right tools, materials, and guidance, you can create a stunning structure that will be the envy of your neighborhood.
So, what are you waiting for? Grab your tools and start building your dream pergola today! Don’t forget to share your progress and photos—we’d love to see your masterpiece!
House