How to Create a Gallery Wall: A Step-by-Step Guide
Gallery walls have become increasingly popular for adding visual interest and personality to any space over the years. Arranging a cohesive collection of art, photographs, prints, mirrors, and other decorative pieces on a wall can make a striking design statement while showcasing your style. The great thing about gallery walls is that you can customize them to match any decor.
In this comprehensive guide, we will walk you through the entire process of planning, preparing, and hanging a beautiful gallery wall in your home. Whether you want to create a travel-inspired display in your living room, highlight family memories in your hallway, or design an art gallery-like arrangement in your office, these tips will help you DIY a gallery wall that reflects your unique taste.
Planning Your Gallery Wall
Careful planning is crucial for pulling off a gallery wall that looks professionally designed. Follow these steps to choose a cohesive theme and artwork for your wall display.
Step 1: Choose a Theme
The first step is deciding on a central theme or concept for your gallery wall. This helps create visual harmony even when using a mix of art mediums and frame styles. Here are some popular gallery wall theme ideas to inspire you:
- Travel – Display photos, souvenirs, and art from countries or cities you’ve visited. Maps and postcards also work nicely.
- Nature – Incorporate floral prints, plant illustrations, landscape paintings, and earthy colours.
- Music – Frame album covers, band posters, music sheets, or photos of you playing instruments.
- Pop Culture – Curate prints and posters featuring your favourite movies, TV shows, books, or celebrities.
- Family – Highlight family memories with portraits, candid shots, wedding photos, and kid art projects.
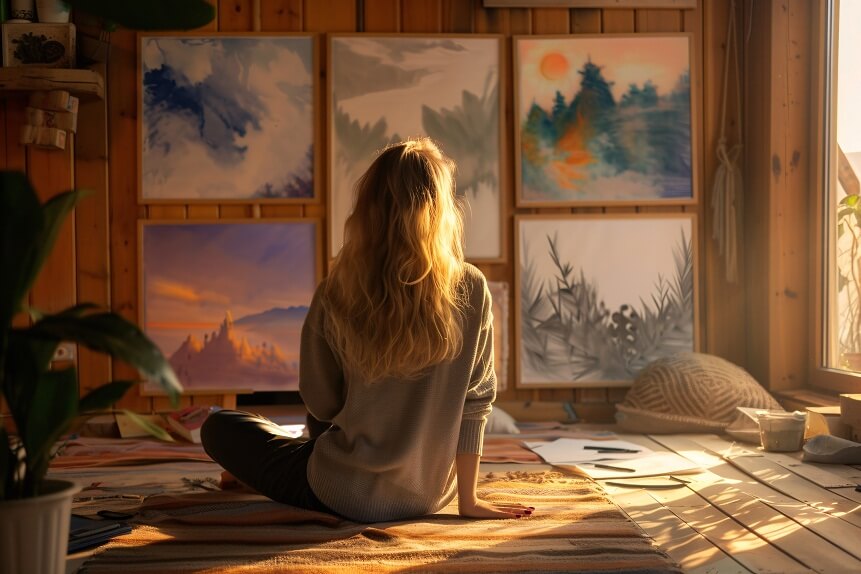
- Art – Showcase reproductions of iconic paintings or your artwork. Mix paintings, drawings, prints, and photographs.
Choose a theme that excites you and fits the existing style of your space. The gallery wall should look cohesive while also showing off your interests.
Step 2: Gather Your Artwork
Once you’ve settled on a theme, start collecting artwork. The beauty of gallery walls lies in the ability to mix and match pieces. Here are some tips for sourcing gallery wall art:
- Size and shape – Include a variety of sizes and shapes for visual interest. Avoid frames that are all the same.
- Colour palette – Stick to a cohesive colour palette that enhances your theme. For example, black and white art for a modern aesthetic.
- Medium – Incorporate different mediums like prints, paintings, photographs, posters, wall art, and 3D objects.
- DIY touches – Add personalized flair with kids’ artwork, photo collages, shadow boxes, and other DIY pieces.
- Quality over quantity – Curate carefully. Include only your favourite pieces that fit your theme and style.
Shop thrift stores, flea markets, Etsy, and art fairs to find unique additions to your gallery wall.
Step 3: Determine the Layout
Now comes the fun part – deciding how to arrange your gallery wall art. How you lay out your pieces makes a huge difference in the look and feel of the display. Here are some popular gallery wall layouts:
- Symmetrical – Frames are evenly spaced and aligned. This traditional layout provides a clean, ordered look.
- Asymmetrical – Artwork is placed unevenly for a playful, free-flowing aesthetic.
- Grid – Pieces are precisely lined up in uniform rows and columns. The grid layout has a modern, graphic appeal.
- Organic – Artwork is clustered and overlapped for a casual, salon-style arrangement.
- Random – Pieces are scattered across the wall in a fun, eclectic display.
Consider the architecture, furniture placement, size, and existing style of the space where your gallery wall will hang. An orderly symmetrical or grid layout tends to suit traditional spaces, while contemporary rooms can handle something more random.
Preparing Your Gallery Wall
Once you’ve checked off all the planning and sourcing steps, it’s time to get your wall ready for hanging artwork. Proper preparation ensures your gallery wall looks professionally installed.
Step 4: Measure and Mark the Wall
Start by measuring the wall space and determining the general area your gallery wall will occupy. Use a level and pencil to lightly mark straight horizontal and vertical lines that act as guidelines for placing your pieces. This helps keep things even and orderly if you want a symmetrical or grid layout.
If doing an asymmetrical, organic, or random arrangement, you don’t need precise marks. Just mark the general perimeter for your artwork.
Step 5: Prepare the Artwork
Get your art gallery-ready by:
- Choosing quality frames that complement each piece. Simple black frames tend to look most cohesive.
- Cutting mats for any artwork or prints. Mats enhance the appearance and provide a polished look.
- Installing D-rings and picture hanging wire on the back of each frame. This allows you to securely hang them on nails.
Take the arrangement you have in mind and lay out all the artwork on the floor before hanging to ensure you have the right sizes, shapes, colours, and balance.
Step 6: Choose the Right Hanging Materials
Your gallery wall canvases, photos, prints, and frames can get heavy, so select durable hanging hardware. Here are some options:
- Screws and molly bolts – Best for heavy frames and securing directly into studs.
- D-rings & picture wire – Allow framed art to hang securely on nails.
- Sawtooth hangers – Attach to the frame back for lightweight pieces.
- Command strips – Adhesive strips work for lightweight unframed prints and canvases.
Nails and hooks are the most secure option for hanging gallery walls. Choose finishes that blend with your frames.
Hanging Your Gallery Wall
Now comes the fun part—seeing your gallery wall design come to life! Follow these tips for properly hanging artwork:
Step 7: Start Hanging
Attach your centrepiece artwork first since it anchors the arrangement. Work your way outward from the middle, evenly spacing pieces as you go.
Use a level often to ensure each piece hangs straight. Stepping back frequently helps you adjust and fill in gaps.
Step 8: Add the Final Touches
Once all the artwork is hung, step back and evaluate the overall look. Make any necessary adjustments to bring your layout into balance. You may need to rearrange pieces, add something bold, or take away artwork that disrupts the flow.
Finally, accent your gallery wall with decorative touches like frames, greenery, string lights, or wall shelves. This completes your art gallery focal point!
Conclusion
With some thoughtful planning and preparation, you can easily create a showstopping gallery wall display. Decide on a theme that inspires you, curate meaningful artwork, determine a layout that fits your space, use proper hanging materials, and don’t be afraid to get creative with eclectic arrangements.
The whole process of designing your gallery wall is meant to be enjoyable. Don’t stress about perfection. It’s about self-expression and finding joy in decorating your home with pieces that make your heart happy.
We hope these tips give you the confidence to finally tackle that blank wall and create a gallery display wall that reflects your personality and style. Just take it one frame at a time. Soon, you’ll have a Pinterest-worthy art wall you can’t stop admiring.