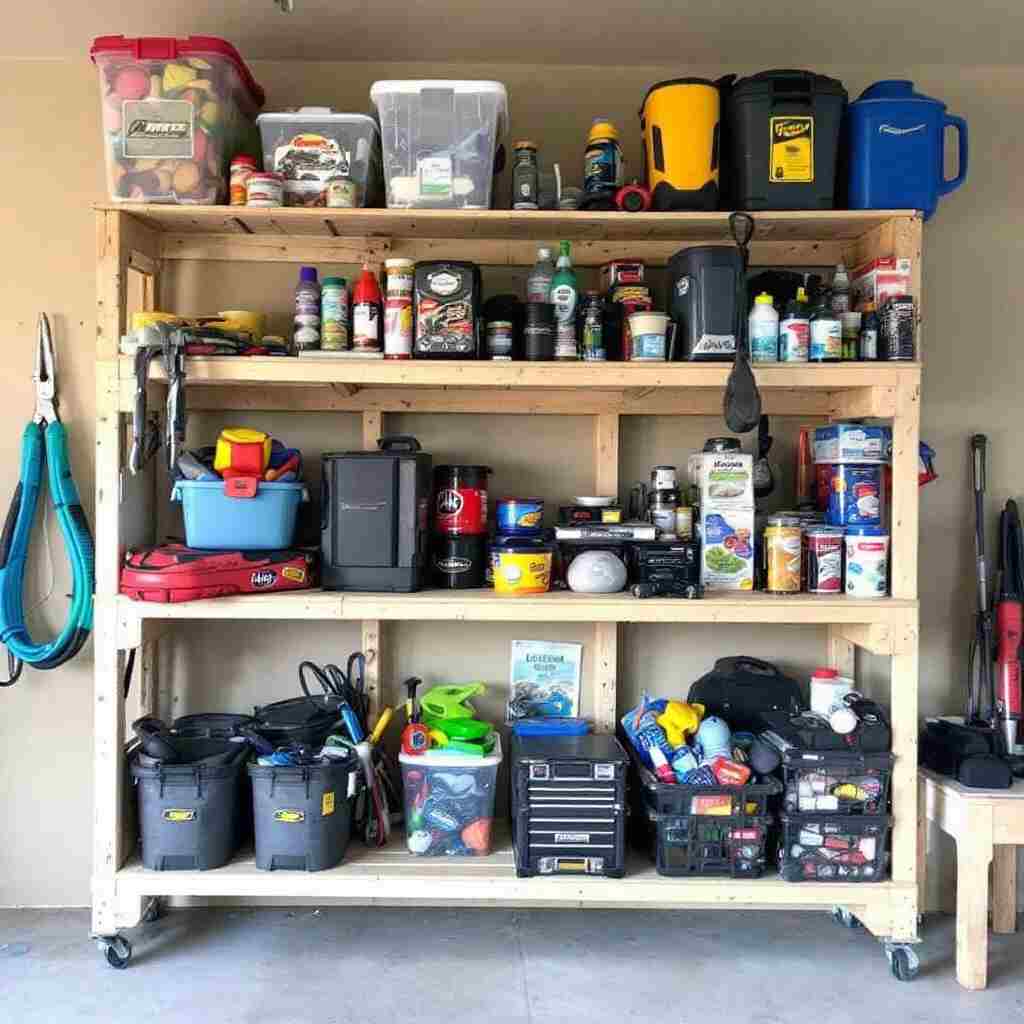
How to Maximize Your Garage Space With DIY Garage Shelves
Are you sick of stumbling over one tool or box or another every time you go into your garage? By building your own garage shelves you could finally condense that clutter and create a tidy working area!
Benefits of DIY Garage Shelving
Space Optimization
Which is why DIY garage shelves help you maximize every inch of the garage. Silvers says, “Rather than just throwing boxes and bins on the floor, shelves let you stack them vertically, freeing up floor space for other purposes, like parking your car or creating a workshop.
Cost-Effectiveness
DIY shelving greatly reduces your expenses. But store-bought shelving units can be pricey, and custom solutions even more so. DIYing your own shelves from cheap materials, such as wood and screws, can go a long way for your wallet.
Customization
Customization is one of the biggest perks of DIY. With the autonomy to design custom shelves, you can craft shelves that suit your ideal spaces and suit your garage specifications, resulting in properly placed and organized tools, containers, or equipment in the process.
Essential Tools and Materials
Tools Needed
- Miter Saw: For accurate cuts on wood.
- Drill/Driver: A must-have for driving screws.
- Circular Saw: Needs for cutting larger sheets of plywood or OSB.
- Use Force: To make sure your shelves are perfectly horizontal.
- Stud Finder: This is important to have to find studs in the wall to mount securely.
Materials Required
- 2×4 Lumber: The bone structure of your shelves.
- Plywood or OSB: For the shelves.
- Wood Screws (1 ¼″ and 3″): For the assembly of the frame and to attach the plywood.
- Lag Screws: To mount the frame to the wall.
Tips for Beginners
Safety should always come first whenever you do something with power tools. Use safety glasses and gloves along with a clear, uncluttered workspace to avoid accidents.
How To Build Garage Shelves Step By Step Guide

Planning Your Shelves
It doesn’t have to be complicated — just use a tape measure to see how much space you have and how big each shelf should be. Note the items you plan to store in there and make sure that the shelves are spaced accordingly.
Assembling the Frame
Use your stud finder to mark the wall where the studs are. Screw horizontal 2x4s to these marks, keeping level. These will be the primary support for your shelves.
Adding the Shelf Top
Step 4: Cut Your Shelf Surface (Optional) Screw the plywood to the top of the frame using wood screws. Ensure that the surface is level and stable.
You may also read (diy pest control effective solutions)
Final Touches
If you ever need more storage, leave the option in between to install more shelves from top or bottom of the first shelf. Once all shelves are set, you could sand and paint them to go with your garage’s aesthetics.
DIY Creative Shelving Ideas

Bracket Shelves
- If you want a modern + minimalist look, use metal brackets to hold up wooden shelf boards. These types of shelving are easy to set up, and can surprisingly hold much weight.
- Floating Shelves
- Floating shelves create a neat, unobtrusive storage area These mount to the wall with no visible supports, providing your garage with a clean, modern look.
Corner Shelves
Pay attention to the corners in your garage. Corner shelves may be a great way to maximize what is often wasted space. These can be tailor-made to snugly fit into any nook and cranny and offer additional storage.
How to Outmaximize Your Garage with these Garage Space Maximizing Tips
Vertical Storage
- Utilise the complete height of your garage walls. Keep less frequently used items higher up, and everyday tools within arms reach.
- Labeling and Organization
- For the sake of keeping things tidy, group items by category and label shelves. Besides, it assists to keep the area clean and tidy which saving time of looking for an item as well.
Seasonal Storage
Assign spaces for seasonal items such as recreation equipment, holiday decorations or gardening apparatus. Rotate these as needed to keep your garage organized throughout the year.
(Taken from Liability with Considerations of Safety)
Weight Capacity
Make sure to account for the weight capacity of your shelves to prevent overburdening them. Make sure that the structure is strong enough to bear the weight load of the stored objects.
Regular Maintenance
Inspect your shelves for signs of wear and periodic damage. If loose screws, replace parts as necessary to keep things safe and stable.
Conclusion
Organizing better and maximizing storage space doesn’t have to be expensive, however, as one solution — installing your own garage shelves — is a fulfilling DIY project that can be customized to fit your needs. Whether you want to open up more floor space or organize your tools in a more efficient way, these shelving ideas DIY are meant to ensure you make the most of every square inch of your garage. So why wait? So grab your tools, and let’s get to building those shelves today!
You may also read (diy kitchen table beginners)