
Have you ever found yourself sitting at a desk, staring at a blank piece of paper, and wishing you could sketch a cozy, welcoming home? You might be a parent looking to impress your kids, or a hobbyist seeking a relaxing, new creative outlet. Often, beginners feel entirely overwhelmed by the thought of capturing straight lines, angled roofs, and perfect windows. The fear of making a mistake can stop you before you even pick up your pencil.
Learn how to draw a house in 12 easy steps—no experience needed. We are going to take that complex building and break it down into bite-sized, totally manageable pieces. You do not need a degree in architecture or years of art school to create something wonderful today..
Did you know that taking up sketching can actively improve your brain? In fact, recent art studies show that engaging in simple drawing exercises, like house sketches, can boost overall creativity by up to 30%. You are not just drawing a house; you are training your brain to see the world differently.
You might be wondering why you should focus on a hou
Why Learn to Draw Houses?

se instead of a flower, a dog, or a human face. The truth
s, learning how to draw a luxury house is one of the very best ways to build your foundational art skills. When you sketch buildings, you are actively practicing your understanding of perspective, geometric shapes, and realistic shading.
Mastering an easy house drawing sets you up for success in almost every other area of art. Here are five fantastic reasons why you should start sketching houses today:
- Enhances observation for architecture lovers: When you draw houses, you start noticing the beautiful details in the buildings around you. You will suddenly appreciate the angle of a roof or the trim around a window on your daily walk.
- Creates a fun family activity: Drawing a house is a wonderful way to bond with your kids. Because the steps rely on basic shapes, children can easily follow along with these simple kids’ tutorials.
- Provides therapeutic stress relief: There is something incredibly calming about drawing straight, structured lines. Focusing on your paper helps melt away the anxieties of a busy workday.
- Serves as a portfolio starter for aspiring artists: Every great artist needs to show they understand spatial awareness and structure. A beautifully shaded house is a fantastic addition to your growing sketchbook or portfolio.
- Taps into modern design trends: In 2026, minimalist home decor searches are trending higher than ever. Drawing clean, modern houses allows you to create your very own trendy wall art for free!
Once you learn the basics, you will realize that drawing is simply a matter of connecting the right shapes in the right order.
Essential Materials for House Drawing
Before we begin our step-by-step house sketch, we need to gather a few simple supplies. You do not need to spend hundreds of dollars on fancy art equipment to get started. In fact, you probably already have most of these items lying around your home!
We highly recommend picking up beginner-friendly supplies that make the process smooth and forgiving. Here is a quick breakdown of what you need, why you need it, and what it might cost you.
ItemRecommendationWhy It Works: Approx. Cost
Pencils HB-4B set , perfect for drawing crisp lines and soft shading , $5
Paper Sketchpad 9×12″ Smooth texture allows for easy erasing $10
Eraser Kneaded Eraser Lifts graphite cleanly for precise corrections $3
Markers Fine-tip black marker Creates bold, confident outlines $8
Ruler 12-inch plastic ruler Ensures perfectly straight edges $2
Pro Tip: You can easily budget under $30 to start drawing houses easily!
Let us talk about why these specific items matter. HB pencils are your standard writing pencils. They are hard enough to keep a sharp point but soft enough to leave a clear mark. Moving up to a 4B pencil gives you a softer lead, which is absolutely magic for adding dark shadows later on.
A kneaded eraser is a must-have tool. Unlike those pink erasers that leave messy crumbs all over your desk, a kneaded eraser works like putty. You can mold it into a sharp point to erase tiny mistakes without ruining your entire drawing. Finally, having a good plastic ruler will save you a lot of frustration when you want your house to stand up straight!
Basic Shapes: The Foundation of Any House
Look around the room you are sitting in right now. Everything you see—your desk, your computer, your coffee mug—can be broken down into basic geometric shapes. The same rule applies when you are learning how to draw a house.
If you can draw a square, a rectangle, and a triangle, you already possess all the skills required to draw a beautiful home. Beginners often fail because they try to draw the “house” all at once. They try to draw the siding, the roof shingles, and the window panes before they even establish the frame. We are going to avoid that trap.
Think of your drawing like building an actual house. You must pour the foundation and frame the walls before you hang the curtains!
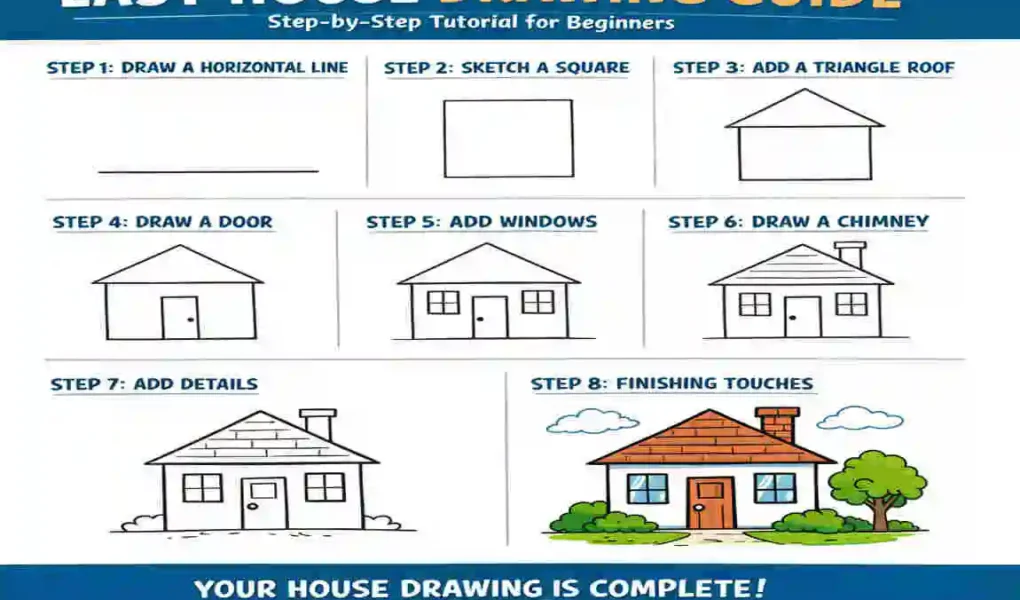
In this beginner drawing tutorial, we will start by using a large rectangle for the home’s main body. Next, we will stack a simple triangle right on top of it to act as the roof. That combination—a rectangular body and a triangular roof—is the very core of our entire project. Once you master this simple framework, you can stretch the rectangle into a mansion or flatten the triangle into a modern cabin. The possibilities are truly endless once you understand the basic shapes.
Step-by-Step Guide: How to Draw a House
Now comes the fun part! Clear your workspace, sharpen your HB pencil, and take a deep breath. We are going to work through this step-by-step house sketch together. Remember to press very lightly with your pencil during the first few steps. You want these early lines to be faint so you can easily erase them later.
Let us discover exactly how to draw a house!
Sketch the Basic Outline
Start by placing your ruler horizontally on your paper. Draw a wide, sturdy rectangle right in the center of your page. This rectangle represents the main body of your house, or its walls.
Keep your pencil pressure light. Imagine you are just whispering on the paper with your lead. If your rectangle looks a little bit uneven, do not panic! You can use your ruler to measure the sides and ensure the left wall is the same height as the right wall. This foundational box dictates the size of your final drawing, so take your time getting the proportions to look pleasing to your eye.
Add the Roof Triangle
Next, we need to protect our house from the rain! Draw an isosceles triangle resting directly on top of your rectangle. An isosceles triangle means the two angles are equal.
Find the exact center of your rectangle’s top line, and make a tiny dot a few inches above it. Now, use your ruler to connect the top-left corner of the rectangle to that dot, then the top-right corner to that dot. Extend the bottom edges of the triangle slightly past the sides of the rectangle to create overhanging eaves. This gives your house a realistic, architectural feel.
Draw the Chimney
A cozy house needs a warm fireplace. Let us add a chimney to the roof. Draw a tall, skinny vertical rectangle sitting on one of the angled sides of your roof.
Here is a common mistake beginners make: they draw the chimney leaning to the side! Make sure the vertical lines of your chimney are perfectly parallel to the vertical walls of your house. The bottom of the chimney should disappear behind the slanted roofline. You can draw the full rectangle first, and then erase the bottom part that overlaps the roof triangle.
Outline Windows and Door
Now we will give our house some character by adding a way in. Draw a tall rectangle right in the middle of the house body for the front door. Add a small half-circle on top of the door for a beautiful arched window, and a tiny circle for a doorknob.
Next, draw two perfectly square windows on either side of the front door. Use your ruler to ensure the bottoms of the windows align perfectly. To make them look like real glass panes, draw a small cross inside each square to represent the window frames.
Add a Pathway
A house feels much more welcoming when there is a clear path leading right to the front door. Start at the bottom corners of your door and draw two curved lines extending downward and outward toward the bottom of your page.
Make the path wider at the bottom of your paper and narrower near the door. This is a very simple trick that creates immediate depth, making the house appear to sit farther back in the distance. You can add a few horizontal lines across this pathway to simulate stepping stones or wooden planks.
Include Trees and Lawn
A house floating in empty white space looks unfinished. We need to ground our drawing by adding some landscaping! Draw a straight horizontal line behind the house to represent the horizon—this separates the sky from the ground.
Next, add some fluffy, cloud-like ovals near the bottom corners of the house to create decorative bushes. If you want to challenge yourself, draw a tall, curvy trunk on one side of the house and top it with a massive, textured oval to represent a large shade tree. These organic shapes contrast beautifully with the building’s rigid geometric lines.
Refine with Perspective Lines
To make your easy house drawing look truly professional, we need to think about perspective. Right now, the house is completely flat. Let us give it a slightly three-dimensional feel.
Draw a second, inner line under the overhanging edges of your roof to show the thickness of the building materials. Add a double line around the door frame and the window frames. This technique mimics the fundamentals of one-point perspective, tricking the viewer’s eye into perceiving depth rather than flat shapes. Adding thickness to your frames instantly elevates your drawing from a simple cartoon to an architectural sketch.
Erase Guidelines
Put down your pencil and grab your kneaded eraser. It is time to clean up our workspace. Carefully rub away any overlapping lines that no longer make sense.
For example, erase the line where the roof overlaps the chimney. Erase the bottom line of the house where the front door sits, so the door opens seamlessly onto the pathway. Roll your kneaded eraser into a soft log and gently dab it over the entire drawing to lighten your pencil strokes. You want your sketch to remain visible, but faint enough that your ink will not have to compete with heavy graphite.
Outline Boldly
Grab your fine-tip black marker. We are going to commit to our lines! Slowly and carefully trace over your final, cleaned-up pencil lines.
Use confident strokes. If you hesitate, your lines might look wiggly. Use your ruler for the straight edges of the walls and roof, but feel free to freehand the bushes and trees to keep them looking natural and organic. Once the marker ink is completely dry (wait at least a minute to prevent smudging!), take your eraser one last time and rigorously erase any remaining pencil marks on the page. You now have a pristine, coloring-book-style image!
Add Shading
Shading is the magic ingredient that brings a flat drawing to life. Pick up your 4B pencil (the darker, softer one). Decide where the sun is shining from. If the sun is in the top left corner of the page, the right side of the chimney and the right side of the house will be in shadow.
Use a technique called “hatching”—drawing small, parallel diagonal lines—to add shadow beneath the roof eaves, inside the window glass, and on the shaded side of the chimney. Keep your shading consistent. Proper shading creates the illusion of volume and makes your house pop right off the page.
Color the House
Now it is time to inject some personality into your home! You can use colored pencils, soft pastels, or even watercolor paints.
Keep your color choices harmonious—a warm, chocolate-brown roof pairs beautifully with soft, sky-blue window panes and a cherry-red front door. When coloring the lawn, use two different shades of green to show highlights where the sun hits the grass and darker shadows beneath the bushes. Color lightly at first, building up layers of pigment to create a rich, vibrant finish.
Final Touches
You have reached the finish line! To make your house truly stunning, we will add some final texture details.
Use a dark pencil or black marker to draw small, alternating rectangular patterns on the chimney to look like bricks. Add a few wavy, vertical lines on the front door to simulate wood grain. You can even draw small, overlapping curved lines on the roof to look like shingles. Add a tiny wisp of smoke curling out of the chimney and a few birds flying in the background sky. These tiny details take your drawing from good to spectacular!
[image:13 from prior] Follow these steps to build your house drawing from sketch to finish.
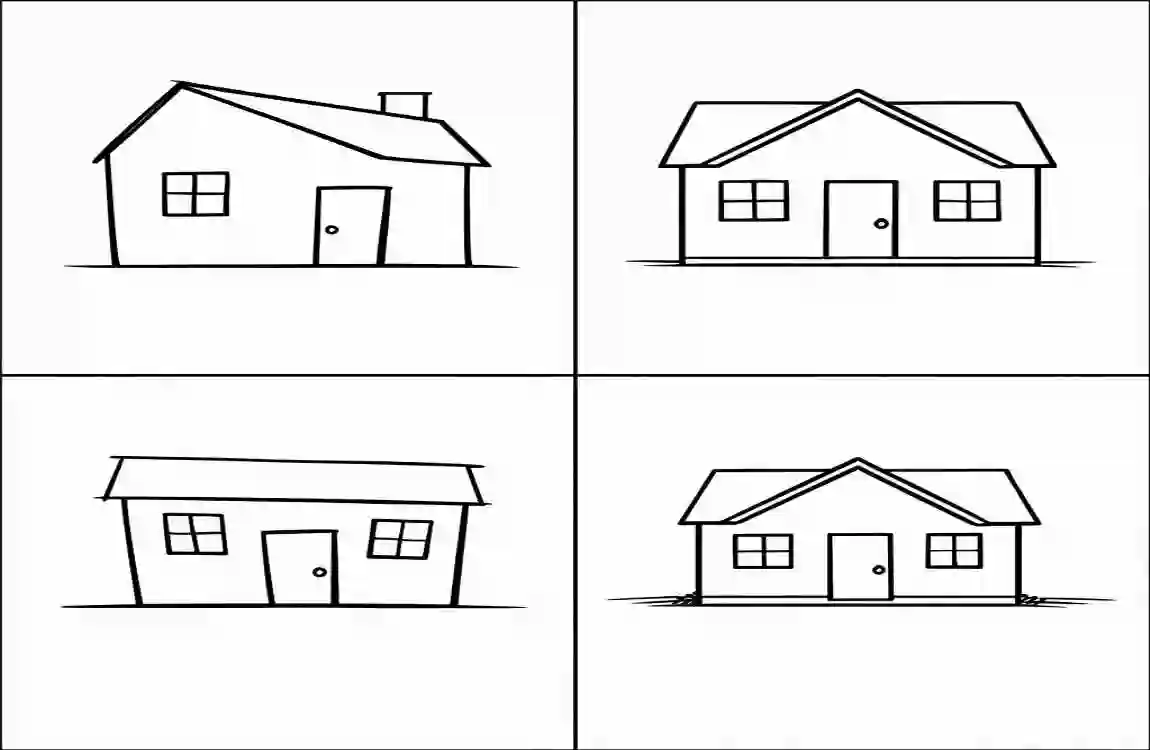
Variations: Easy House Styles to Try
Once you master how to draw a house using our basic rectangular method, a whole new world of artistic architecture opens up to you. You do not have to draw the same house every single time! By simply tweaking the basic shapes we discussed earlier, you can experiment with dozens of unique styles.
Here are a few popular variations you should absolutely try:
- The Cartoon House for Kids: To make a house look like it belongs in an animated movie, exaggerate the proportions. Make the roof extra tall and pointy, and curve the straight walls slightly outward so the house looks bouncy and plump. Add oversized, round windows and a crooked chimney for maximum charm.
- Modern Minimalist Architecture: If you love sleek design, drop the triangle roof entirely! Draw a series of intersecting flat rectangles. Use massive, floor-to-ceiling windows and stick to a flat roof. This style is incredibly popular and incredibly easy to draw with a ruler.
- The Cozy English Cottage: Instead of straight, rigid lines, use slightly wavy, organic lines for the roof to simulate heavy thatch. Add lots of climbing vines around the front door, a cobblestone path, and a crooked little wooden gate.
- The Emoji-Style House: Want to draw something cute and simple for your journal? Draw a tiny square, pop a red triangle on top, and add a single brown door. It is the perfect icon-sized sketch!
Remember, once you master the foundational steps, experimenting with styles is where your true creativity shines!
Common Mistakes and Fixes
Even the best artists make mistakes, so please don’t get frustrated if your first drawing isn’t a masterpiece. Learning how to draw a house takes a bit of patience. Let us troubleshoot some of the most common hurdles beginners face.
The Crooked Roof Problem: Does your house look like it is leaning backward or about to fall over? This happens when your vertical lines are not perfectly parallel to the edge of your paper. Fix: Always use a ruler. Align the bottom of your ruler with the bottom edge of your sketchbook to ensure your vertical lines stand straight up.
The Flat Shading Issue: Does your house look like a piece of cardboard even after you added shadows? This happens when you only use one shade of gray. Fix: You must layer your gradients! The shadow directly beneath the roof overhang should be nearly pitch-black, fading slowly into a lighter gray as it moves down the wall. Push your pencil harder into the deepest shadows to create high contrast.
Advanced Tips for Stunning Houses
Are you ready to level up your easy house drawing skills? Once you feel totally comfortable with the 12 steps above, you can start incorporating advanced techniques to make your art truly breathtaking.
First, dive deeper into perspective tricks. Instead of drawing the front of the house flat, try drawing it from a three-quarter angle using two-point perspective. This involves placing two vanishing points on your horizon line and angling all your walls toward them. It creates a stunningly realistic 3D effect.
Next, play with dramatic lighting effects. Instead of drawing your stunning house during the day, draw it at night! Color the sky deep purple and black, and use bright yellow pastels to make the windows glow from the inside. The contrast between the dark exterior and the warm, lit windows is incredibly eye-catching.
Finally, consider exploring digital tools. If you have an iPad, apps like Procreate let you draw perfect straight lines automatically and experiment with hundreds of textured brushes. Digital art takes the stress out of making permanent mistakes!
Free Printable Worksheet
We know that looking at a screen while drawing can sometimes be distracting. That is why we have put together a special bonus just for you!
To help you master this beginner drawing tutorial, we offer a downloadable step-by-step template. This printable worksheet includes light tracing guidelines for every single step of the process, a dedicated grid to practice your perspective lines, and a blank space for your final masterpiece. It is the perfect companion for anyone who wants to practice offline or share the activity with their family.
Head over to our art resources section and sign up for our weekly newsletter to grab your free printable worksheet today! It is the perfect tool to keep your creativity flowing.
FAQ Section
How long does it take to learn how to draw a house? Believe it or not, you can learn the basics in about 15 minutes! The 12 steps outlined in our guide are designed to yield immediate results. Of course, mastering advanced shading and intricate details will take more practice. Still, you can confidently sketch a basic home on your very first day.
Is this tutorial best for kids or adults? Both! The beauty of an easy house drawing is its universal appeal. If you are teaching kids, simplify the steps by skipping the perspective and advanced shading sections. Focus strictly on the basic shapes and let them go wild with crayons. Adults will enjoy diving deep into the ruler measurements and fine details.
What is the hardest part about drawing a house? For most beginners, the hardest part is making the roof look symmetrical and ensuring the perspective is correct. That is why we heavily emphasize finding the exact center point for your roof triangle and double-checking your vertical lines with a ruler.
Do I absolutely need to use a ruler? No, you do not have to use a ruler, especially if you prefer a sketchy, organic, or cartoonish style. However, if you want your drawing to look like a realistic architectural step-by-step house sketch, a ruler is highly recommended to keep your structural lines crisp and clean.
Can I draw a house without an eraser? It is possible, but we do not recommend it for beginners! Drawing a house requires laying down “guidelines”—like the base rectangle—that eventually get covered up by roofs and doors. A well-kneaded eraser lets you remove temporary lines and keep your final artwork looking pristine.
How do I make my house drawing look more realistic? Realism comes down to two things: accurate proportions and dramatic shading. Focus heavily on Step 10 of our guide. Pay close attention to where shadows naturally fall (under the eaves, inside window frames, behind bushes). Contrast is the key to realism!