<h4 id="we-ve-noticed-unusual-query-volume-please-contact-us-mailto-hey-you-com-with-the-following-error-id-411ce461-b281-4ca9-80ec-996c6be90f95-ca194b70-6eda-48ee-92db-dd05737104b0-2026-05-12t20-56-52-637z-">Drawing a house is one of the most rewarding and fun ways to start your drawing journey. Whether you’re a beginner, a hobbyist, or just looking for something creative to do, learning <strong>how to draw a house</strong> can open the door to endless possibilities in art and design. The best part? It’s simple, easy, and doesn’t require fancy tools or expensive materials.</h4>
<p>In this guide, we’ll walk you through <strong>step-by-step instructions</strong> to draw a house, explain the basics of perspective, and even explore how to add creative details like windows, textures, and colors. By the end, you’ll be able to create your very own house drawings with confidence and style!</p>
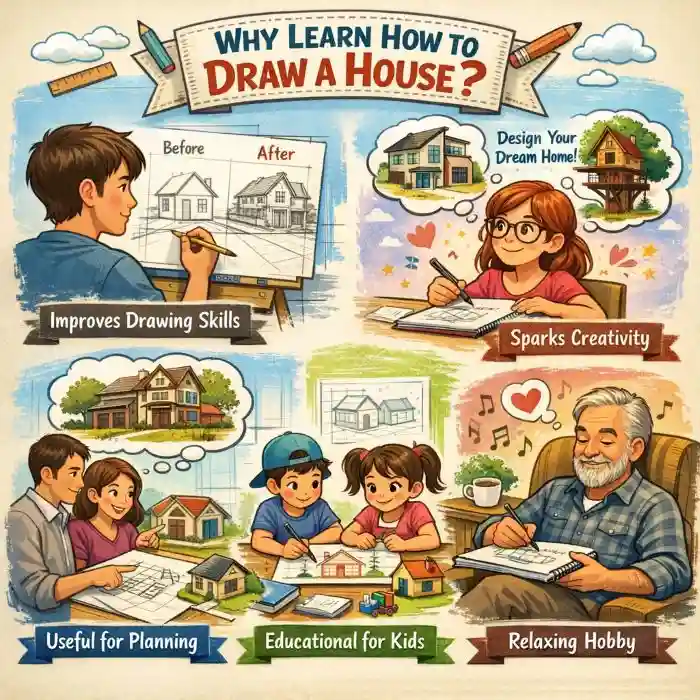
<h2 id="-why-learn-how-to-draw-a-house-"><strong>Why Learn How to Draw a House?</strong></h2>
<p><img class="aligncenter wp-image-7010 size-full" src="https://comeawayhome.co.uk/wp-content/uploads/2026/05/f966e785-7221-4e2b-bbb5-b1f9416b8766x-ezgif.com-jpg-to-webp-converter.webp" alt="how to draw a house" width="700" height="700" /></p>
<h3 id="h2-the-perfect-beginner-subject">The Perfect Beginner Subject</h3>
<p>If you’re new to drawing, houses are an excellent starting point. Why? Because they consist of <strong>simple shapes</strong> like rectangles, squares, and triangles. Plus, they’re visually appealing and easy to customize. From cozy cottages to modern mansions, houses allow you to experiment with perspective, proportions, and details.</p>
<p>This tutorial is perfect for:</p>
<ul>
<li><strong>Kids</strong> who want to unleash their creativity.</li>
<li><strong>Beginners</strong> looking to improve their basic drawing skills.</li>
<li><strong>DIY enthusiasts</strong> sketching home ideas.</li>
<li><strong>Hobbyists</strong> who want to try something new.</li>
</ul>
<p>By following this guide, you’ll learn a <strong>repeatable, step-by-step process</strong> that makes drawing a house both fun and approachable.</p>
<h2 id="-before-you-start-tools-and-basics-"><strong>Before You Start: Tools and Basics</strong></h2>
<h3 id="h2-what-you-need-to-draw-a-house">H2: What You Need to Draw a House</h3>
<p>You don’t need an artist’s studio to get started. Just gather these basic materials:</p>
<ul>
<li>A <strong>pencil</strong> (HB for light sketching, and 2B for darker outlines).</li>
<li>An <strong>eraser</strong> for cleaning up your lines.</li>
<li>A <strong>ruler</strong> to ensure straight edges.</li>
<li><strong>Paper</strong> (sketchbook, printer paper, or any plain sheet will do).</li>
</ul>
<p>Optional tools:</p>
<ul>
<li><strong>Colored pencils</strong> or markers for adding finishing touches.</li>
<li>A <strong>compass</strong> or protractor if you’re feeling fancy.</li>
</ul>
<p><strong>Pro Tip:</strong> Don’t worry about having expensive tools. A simple pencil and paper are all you need to master <a href="https://colormadehappy.com/how-to-draw-a-house/"><strong>how to draw a house</strong></a>.</p>
<h3 id="h2-simple-drawing-concepts-to-remember">Simple Drawing Concepts to Remember</h3>
<p>Before diving into the steps, here are a few basic drawing tips to keep in mind:</p>
<ol>
<li><strong>Start with light lines:</strong> Use soft, faint strokes to sketch outlines. You can darken them later when you’re confident.</li>
<li><strong>Think in shapes:</strong> Most <a href="https://comeawayhome.co.uk/what-is-a-trap-house/">houses</a> consist of rectangles for walls, triangles for roofs, and squares for windows. Breaking objects into shapes simplifies the process.</li>
<li><strong>Guide lines are your friend:</strong> Draw light guide lines to maintain symmetry and erase them once your shapes look good.</li>
</ol>
<p>These fundamental concepts will make drawing a house much easier, even for total beginners.</p>
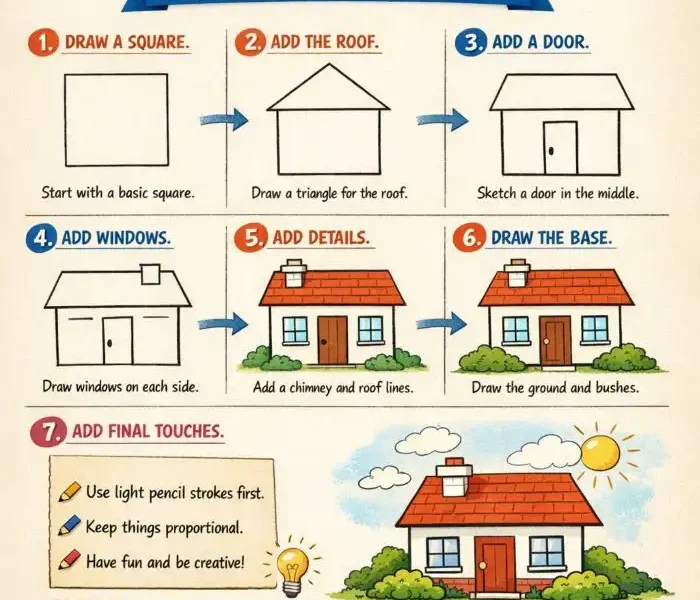
<h2 id="-step-by-step-how-to-draw-a-simple-house-"><strong>Step-by-Step: How to Draw a Simple House</strong></h2>
<p>Let’s dive into the fun part! Follow these <strong>step-by-step instructions</strong> to create a basic house drawing.</p>
<h3 id="h2-step-1-draw-the-basic-house-shape">Step 1 – Draw the Basic House Shape</h3>
<ol>
<li>Start with a <strong>rectangle</strong> for the main body of the house.
<ul>
<li>Proportions matter! Make the rectangle slightly wider than it is tall for a natural look.</li>
</ul>
</li>
<li>Add a <strong>triangle</strong> on top for the roof. You can use a ruler to keep the lines clean and sharp.<br />
<em>Tip:</em> Think of the roof as a chevron or peak sitting on the rectangle.</li>
</ol>
<h3 id="h2-step-2-add-the-door-and-windows">Step 2 – Add the Door and Windows</h3>
<ol>
<li>Draw a <strong>rectangle</strong> near the bottom center of the house for the door.
<ul>
<li>Keep the door proportional—neither too big nor too small.</li>
</ul>
</li>
<li>Add <strong>two or three squares or rectangles</strong> for windows. Position them evenly across the front wall.<br />
<em>Tip:</em> Avoid crowding the windows too close to each other or the edges.</li>
</ol>
<h3 id="h2-step-3-finalize-the-roof-and-outline">Step 3 – Finalize the Roof and Outline</h3>
<ol>
<li>Thicken the roof’s <strong>outline</strong> to make it stand out.</li>
<li>Erase any extra guide lines to clean up the drawing.</li>
<li>Use your ruler for straight edges and symmetry.</li>
</ol>
<p><strong>Pro Tip:</strong> Want your house to look more realistic? Slightly tilt the roof and add an overhang for a three-dimensional touch.</p>
<h2 id="-adding-perspective-how-to-draw-a-house-from-the-side-"><strong>Adding Perspective: How to Draw a House from the Side</strong></h2>
<p>Once you’re comfortable drawing the front view of a house, it’s time to add depth with perspective.</p>
<h3 id="h2-turn-a-front-house-into-a-side-view">Turn a Front House into a Side View</h3>
<ol>
<li>Start with your basic rectangle and triangle (front view).</li>
<li>Add a <strong>vertical rectangle</strong> to the side of the house—this will act as the side wall.</li>
<li>Extend the roof lines diagonally to connect the front and side walls.</li>
</ol>
<h3 id="h2-light-3-point-perspective-for-beginners">Light 3-Point Perspective for Beginners</h3>
<p>Perspective doesn’t have to be intimidating! Here’s a simple way to add depth:</p>
<ol>
<li>Use <strong>one vanishing point</strong> above the house.</li>
<li>Extend the roof and walls toward this vanishing point.</li>
<li>Keep the lines light and erase any extras once you’re happy with the result.</li>
</ol>
<p>This technique will make your house look more three-dimensional without overwhelming you with complicated rules.</p>
<h2 id="-designing-different-house-styles-"><strong>Designing Different House Styles</strong></h2>
<p>Now that you’ve mastered the basics, let’s explore how to draw different types of houses.</p>
<h3 id="h2-how-to-draw-a-cottage-house">How to Draw a Cottage House</h3>
<ol>
<li>Start with a smaller rectangle and a <strong>pointed roof</strong>.</li>
<li>Add details like a <strong>chimney</strong>, <strong>flower beds</strong>, or a <strong>picket fence</strong> to give it character.</li>
<li>Use curved lines for a cozy, whimsical feel.</li>
</ol>
<h3 id="h2-how-to-draw-a-modern-house">How to Draw a Modern House</h3>
<ol>
<li>Use <strong>flat roofs</strong> and <strong>sharp edges</strong> for a modern aesthetic.</li>
<li>Add large rectangular windows and keep the design minimal.</li>
<li>Focus on straight, clean lines without too many decorative elements.</li>
</ol>
<h3 id="h2-how-to-draw-a-mansion-or-two-story-house">How to Draw a Mansion or Two-Story House</h3>
<ol>
<li>Stack <strong>two rectangles</strong> vertically to create multiple floors.</li>
<li>Add <strong>stairs</strong>, <strong>balconies</strong>, or <strong>extra windows</strong> for more detail.</li>
<li>Remember, the same basic steps apply—you’re just scaling up!</li>
</ol>
<table>
<thead>
<tr>
<th><strong>House Style</strong></th>
<th><strong>Key Features</strong></th>
<th><strong>Ideal For</strong></th>
</tr>
</thead>
<tbody>
<tr>
<td>Cottage</td>
<td>Pointed roof, chimney</td>
<td>Cozy, playful designs</td>
</tr>
<tr>
<td>Modern</td>
<td>Flat roof, minimal details</td>
<td>Sleek, contemporary art</td>
</tr>
<tr>
<td>Mansion</td>
<td>Multi-story, added details</td>
<td>Showcasing grandeur</td>
</tr>
</tbody>
</table>
<h2 id="-adding-details-and-texture-"><strong>Adding Details and Texture</strong></h2>
<p>Details make your drawing come alive! Let’s add some finishing touches.</p>
<h3 id="h2-window-frames-doors-and-steps">Window Frames, Doors, and Steps</h3>
<ol>
<li>Add <strong>frame lines</strong> inside the windows to give them depth.</li>
<li>Shade the door lightly or add a handle for a polished look.</li>
<li>Draw <strong>steps</strong> leading up to the front door—2–3 will do.</li>
</ol>
<h3 id="h2-roof-shingles-bricks-and-shading">Roof Shingles, Bricks, and Shading</h3>
<ol>
<li>Use <strong>short lines</strong> to create shingles or tiles on the roof.</li>
<li>Add <strong>tiny rectangles</strong> for bricks on the house walls.</li>
<li>Lightly shade one side of the house to simulate shadows and dimension.</li>
</ol>
<p><strong>Pro Tip:</strong> Small details like these make your house look much more professional.</p>
<h2 id="-background-and-context-making-the-house-feel-real-"><strong>Background and Context: Making the House Feel Real</strong></h2>
<p>A house looks best when it’s part of a scene. Add simple elements like trees, fences, and a sky to bring your drawing to life.</p>
<h3 id="h2-trees-clouds-and-sky">Trees, Clouds, and Sky</h3>
<ol>
<li>Draw a <strong>tree or two</strong> near the house. Use ovals for the tree tops and a simple trunk.</li>
<li>Add <strong>clouds</strong> in the sky and a simple horizon line for depth.</li>
</ol>
<h3 id="h2-fence-driveway-and-garden">Fence, Driveway, and Garden</h3>
<ol>
<li>Sketch a <strong>short fence</strong> along the front yard.</li>
<li>Add a <strong>driveway</strong> or path leading up to the door.</li>
<li>Sprinkle a few plants or flowers for extra charm.</li>
</ol>
<h2 id="-coloring-your-house-drawing-"><strong>Coloring Your House Drawing</strong></h2>
<p>Adding color is the final step to make your house pop!</p>
<h3 id="h2-choosing-colors-for-your-house">Choosing Colors for Your House</h3>
<ul>
<li>Common combos include:
<ul>
<li>Beige walls, brown roof, green door.</li>
<li>White walls with any colored roof.</li>
</ul>
</li>
<li>Be creative—there’s no wrong way to color your house!</li>
</ul>
<h3 id="h2-simple-color-techniques">Simple Color Techniques</h3>
<ol>
<li>Start with <strong>flat colors</strong> using colored pencils or markers.</li>
<li>Add a darker shade along edges for depth and dimension.</li>
<li>Keep your strokes light to avoid smudging.</li>
</ol>
<h2 id="-final-tips-and-call-to-action-"><strong>Final Tips and Call-to-Action</strong></h2>
<h3 id="h2-recap-how-to-draw-a-house-the-simple-way">Recap: How to Draw a House the Simple Way</h3>
<p>Drawing a house is all about breaking it down into <strong>simple steps</strong>:</p>
<ol>
<li>Sketch the basic shapes.</li>
<li>Add details like doors, windows, and textures.</li>
<li>Finish with colors or shading.</li>
</ol>
<p>With practice, you’ll be able to draw houses from memory and even design your own styles. So, grab your pencil and start drawing!</p>
<p><a href="https://comeawayhome.co.uk/">House</a></p>
In this guide, we’ll walk you through step-by-step instructions to draw a house, explain the basics of perspective, and even explore how to add creative details like windows, textures, and colors. By the end, you’ll be able to create your very own house drawings with confidence and style!
Why Learn How to Draw a House?
The Perfect Beginner Subject
If you’re new to drawing, houses are an excellent starting point. Why? Because they consist of simple shapes like rectangles, squares, and triangles. Plus, they’re visually appealing and easy to customize. From cozy cottages to modern mansions, houses allow you to experiment with perspective, proportions, and details.
This tutorial is perfect for:
- Kids who want to unleash their creativity.
- Beginners looking to improve their basic drawing skills.
- DIY enthusiasts sketching home ideas.
- Hobbyists who want to try something new.
By following this guide, you’ll learn a repeatable, step-by-step process that makes drawing a house both fun and approachable.
H2: What You Need to Draw a House
You don’t need an artist’s studio to get started. Just gather these basic materials:
- A pencil (HB for light sketching, and 2B for darker outlines).
- An eraser for cleaning up your lines.
- A ruler to ensure straight edges.
- Paper (sketchbook, printer paper, or any plain sheet will do).
Optional tools:
- Colored pencils or markers for adding finishing touches.
- A compass or protractor if you’re feeling fancy.
Pro Tip: Don’t worry about having expensive tools. A simple pencil and paper are all you need to master how to draw a house.
Simple Drawing Concepts to Remember
Before diving into the steps, here are a few basic drawing tips to keep in mind:
- Start with light lines: Use soft, faint strokes to sketch outlines. You can darken them later when you’re confident.
- Think in shapes: Most houses consist of rectangles for walls, triangles for roofs, and squares for windows. Breaking objects into shapes simplifies the process.
- Guide lines are your friend: Draw light guide lines to maintain symmetry and erase them once your shapes look good.
These fundamental concepts will make drawing a house much easier, even for total beginners.
Step-by-Step: How to Draw a Simple House
Let’s dive into the fun part! Follow these step-by-step instructions to create a basic house drawing.
Step 1 – Draw the Basic House Shape
- Start with a rectangle for the main body of the house.
- Proportions matter! Make the rectangle slightly wider than it is tall for a natural look.
- Add a triangle on top for the roof. You can use a ruler to keep the lines clean and sharp.
Tip: Think of the roof as a chevron or peak sitting on the rectangle.
Step 2 – Add the Door and Windows
- Draw a rectangle near the bottom center of the house for the door.
- Keep the door proportional—neither too big nor too small.
- Add two or three squares or rectangles for windows. Position them evenly across the front wall.
Tip: Avoid crowding the windows too close to each other or the edges.
Step 3 – Finalize the Roof and Outline
- Thicken the roof’s outline to make it stand out.
- Erase any extra guide lines to clean up the drawing.
- Use your ruler for straight edges and symmetry.
Pro Tip: Want your house to look more realistic? Slightly tilt the roof and add an overhang for a three-dimensional touch.
Adding Perspective: How to Draw a House from the Side
Once you’re comfortable drawing the front view of a house, it’s time to add depth with perspective.
Turn a Front House into a Side View
- Start with your basic rectangle and triangle (front view).
- Add a vertical rectangle to the side of the house—this will act as the side wall.
- Extend the roof lines diagonally to connect the front and side walls.
Light 3-Point Perspective for Beginners
Perspective doesn’t have to be intimidating! Here’s a simple way to add depth:
- Use one vanishing point above the house.
- Extend the roof and walls toward this vanishing point.
- Keep the lines light and erase any extras once you’re happy with the result.
This technique will make your house look more three-dimensional without overwhelming you with complicated rules.
Designing Different House Styles
Now that you’ve mastered the basics, let’s explore how to draw different types of houses.
How to Draw a Cottage House
- Start with a smaller rectangle and a pointed roof.
- Add details like a chimney, flower beds, or a picket fence to give it character.
- Use curved lines for a cozy, whimsical feel.
How to Draw a Modern House
- Use flat roofs and sharp edges for a modern aesthetic.
- Add large rectangular windows and keep the design minimal.
- Focus on straight, clean lines without too many decorative elements.
How to Draw a Mansion or Two-Story House
- Stack two rectangles vertically to create multiple floors.
- Add stairs, balconies, or extra windows for more detail.
- Remember, the same basic steps apply—you’re just scaling up!
| House Style |
Key Features |
Ideal For |
| Cottage |
Pointed roof, chimney |
Cozy, playful designs |
| Modern |
Flat roof, minimal details |
Sleek, contemporary art |
| Mansion |
Multi-story, added details |
Showcasing grandeur |
Adding Details and Texture
Details make your drawing come alive! Let’s add some finishing touches.
Window Frames, Doors, and Steps
- Add frame lines inside the windows to give them depth.
- Shade the door lightly or add a handle for a polished look.
- Draw steps leading up to the front door—2–3 will do.
Roof Shingles, Bricks, and Shading
- Use short lines to create shingles or tiles on the roof.
- Add tiny rectangles for bricks on the house walls.
- Lightly shade one side of the house to simulate shadows and dimension.
Pro Tip: Small details like these make your house look much more professional.
Background and Context: Making the House Feel Real
A house looks best when it’s part of a scene. Add simple elements like trees, fences, and a sky to bring your drawing to life.
Trees, Clouds, and Sky
- Draw a tree or two near the house. Use ovals for the tree tops and a simple trunk.
- Add clouds in the sky and a simple horizon line for depth.
Fence, Driveway, and Garden
- Sketch a short fence along the front yard.
- Add a driveway or path leading up to the door.
- Sprinkle a few plants or flowers for extra charm.
Coloring Your House Drawing
Adding color is the final step to make your house pop!
Choosing Colors for Your House
- Common combos include:
- Beige walls, brown roof, green door.
- White walls with any colored roof.
- Be creative—there’s no wrong way to color your house!
Simple Color Techniques
- Start with flat colors using colored pencils or markers.
- Add a darker shade along edges for depth and dimension.
- Keep your strokes light to avoid smudging.
Final Tips and Call-to-Action
Recap: How to Draw a House the Simple Way
Drawing a house is all about breaking it down into simple steps:
- Sketch the basic shapes.
- Add details like doors, windows, and textures.
- Finish with colors or shading.
With practice, you’ll be able to draw houses from memory and even design your own styles. So, grab your pencil and start drawing!
House