<p><span data-preserver-spaces="true">Creating a </span><strong><span data-preserver-spaces="true">DIY house model</span></strong><span data-preserver-spaces="true"> is more than just a craft—it’s a creative journey that combines imagination, precision, and hands-on skills. Whether you are a student working on a school project, an architecture enthusiast, or simply looking for a fun home activity, learning </span><strong><span data-preserver-spaces="true">how to make a model of a house</span></strong><span data-preserver-spaces="true"> can be both satisfying and educational. Miniature models offer a unique way to visualize architectural ideas, test layouts, and even decorate your space with something personal and handcrafted.</span></p>
<p><span data-preserver-spaces="true">DIY house models are trending for several reasons. Many hobbyists love the sense of accomplishment from building a </span><strong><span data-preserver-spaces="true">scale model house</span></strong><span data-preserver-spaces="true">. At the same time, educators find it an excellent teaching tool for geometry, design, and spatial planning. Additionally, creating your model at <a href="https://comeawayhome.co.uk/kristin-cavallaris-new-woodland-retreat-inside-her-stunning-tennessee-home-tour/">home</a> offers opportunities for </span><strong><span data-preserver-spaces="true">customization, cost savings</span></strong><span data-preserver-spaces="true">, and even for creatively recycling old materials.</span></p>
<h2><span data-preserver-spaces="true">Materials Needed</span></h2>
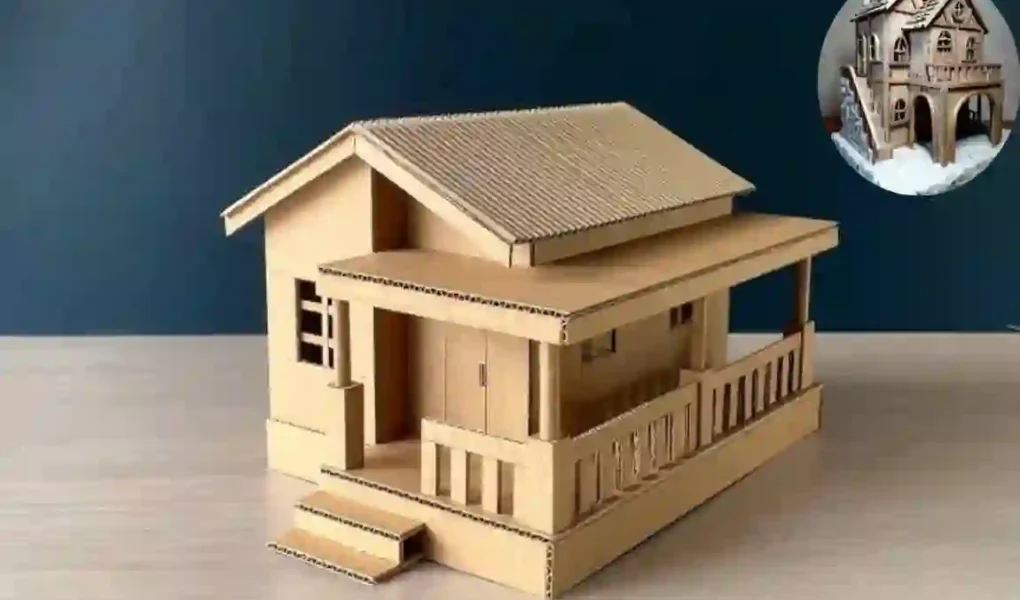
<p><img class="alignnone wp-image-6758 size-full" src="https://comeawayhome.co.uk/wp-content/uploads/2026/04/Untitleddesign81_imresizer-ezgif.com-jpg-to-webp-converter.webp" alt="Stunning DIY House Model at Home" width="1150" height="750" /></p>
<p><span data-preserver-spaces="true">Before you start building, gather your supplies. Keeping materials </span><strong><span data-preserver-spaces="true">affordable and accessible</span></strong><span data-preserver-spaces="true"> is key, especially if you’re building your </span><strong><span data-preserver-spaces="true">DIY house model at home</span></strong><span data-preserver-spaces="true">.</span></p>
<h3><span data-preserver-spaces="true">Essential Supplies</span></h3>
<ul>
<li><strong><span data-preserver-spaces="true">Cardboard or foam board</span></strong><span data-preserver-spaces="true"> – Ideal for walls, <a href="https://comeawayhome.co.uk/using-tyvek-on-a-roof-is-it-suitable-for-home-projects/">roof</a>, and base; lightweight yet sturdy.</span></li>
<li><strong><span data-preserver-spaces="true">Craft knife, ruler, cutting mat</span></strong><span data-preserver-spaces="true"> – Ensures clean, accurate cuts for professional results.</span></li>
<li><strong><span data-preserver-spaces="true">Glue gun, white glue, tape</span></strong><span data-preserver-spaces="true"> – For assembling walls and securing decorations.</span></li>
<li><strong><span data-preserver-spaces="true">Acrylic paints, markers, brushes</span></strong><span data-preserver-spaces="true"> – Add color, texture, and character.</span></li>
<li><strong><span data-preserver-spaces="true">Optional items</span></strong><span data-preserver-spaces="true">: small LED lights, fabric for curtains, miniature furniture kits.</span></li>
</ul>
<h2><span data-preserver-spaces="true">plan Your Design</span></h2>
<p><span data-preserver-spaces="true">The first step in </span><strong><span data-preserver-spaces="true">building a house</span></strong><span data-preserver-spaces="true"> model is planning. A solid blueprint ensures your model will be realistic and well-proportioned.</span></p>
<h3><span data-preserver-spaces="true">Choosing the Scale</span></h3>
<p><span data-preserver-spaces="true">Decide on the scale of your model. A </span><strong><span data-preserver-spaces="true">1:50 ratio</span></strong><span data-preserver-spaces="true"> is common, meaning 1 cm on the model represents 50 cm in real life. Scale consistency helps when adding furniture, windows, and landscaping.</span></p>
<h3><span data-preserver-spaces="true">Sketching Your Layout</span></h3>
<ul>
<li><span data-preserver-spaces="true">Draw your floor plan on graph paper.</span></li>
<li><span data-preserver-spaces="true">Mark walls, doors, windows, and room divisions.</span></li>
<li><span data-preserver-spaces="true">Decide on architectural style—modern, traditional, or minimalist.</span></li>
</ul>
<p><span data-preserver-spaces="true">Beginner tip: Free online tools like </span><strong><span data-preserver-spaces="true">SketchUp</span></strong><span data-preserver-spaces="true"> or </span><strong><span data-preserver-spaces="true">Floorplanner</span></strong><span data-preserver-spaces="true"> help visualize your model digitally before cutting materials.</span></p>
<h2><span data-preserver-spaces="true">Measure and Cut the Base</span></h2>
<p><span data-preserver-spaces="true">A solid foundation is crucial for a stable model. The base acts like the “ground” your house will stand on.</span></p>
<h3><span data-preserver-spaces="true">Cutting the Base</span></h3>
<ol>
<li><span data-preserver-spaces="true">Choose foam board for durability.</span></li>
<li><span data-preserver-spaces="true">Measure your dimensions carefully using a ruler.</span></li>
<li><span data-preserver-spaces="true">Cut a rectangular shape representing the footprint of your house.</span></li>
</ol>
<h3><span data-preserver-spaces="true">Adding Realism</span></h3>
<ul>
<li><span data-preserver-spaces="true">Include pathways or garden space in the base measurements.</span></li>
<li><span data-preserver-spaces="true">Draw grid lines lightly on the base to guide wall placement.</span></li>
</ul>
<p><strong><span data-preserver-spaces="true">Example Table – Base Measurements for Different House Sizes</span></strong></p>
<p><span data-preserver-spaces="true">House TypeBase LengthBase WidthRecommended Scale</span></p>
<p><span data-preserver-spaces="true">Small Cottage 20 cm 15 cm 1:50</span></p>
<p><span data-preserver-spaces="true">Medium Home 30 cm 25 cm 1:50</span></p>
<p><span data-preserver-spaces="true">Large Villa 50 cm 40 cm 1:50</span></p>
<h2><span data-preserver-spaces="true">Build the Walls</span></h2>
<p><span data-preserver-spaces="true">With the base ready, it’s time to construct walls. This step defines the shape and structure of your model.</span></p>
<h3><span data-preserver-spaces="true">Assembling Vertical Panels</span></h3>
<ul>
<li><span data-preserver-spaces="true">Cut cardboard or foam board into panels for each wall.</span></li>
<li><span data-preserver-spaces="true">Use a </span><strong><span data-preserver-spaces="true">craft knife and ruler</span></strong><span data-preserver-spaces="true"> for precise edges.</span></li>
<li><span data-preserver-spaces="true">Score and fold sections for doors or windows.</span></li>
</ul>
<h3><span data-preserver-spaces="true">Securing Walls</span></h3>
<ul>
<li><span data-preserver-spaces="true">Apply glue along the edges and press firmly onto the base.</span></li>
<li><span data-preserver-spaces="true">Reinforce corners with extra tape or cardboard strips for stability.</span></li>
</ul>
<h2><span data-preserver-spaces="true">Construct the Roof</span></h2>
<p><span data-preserver-spaces="true">The roof is a defining feature of any house model.</span></p>
<h3><span data-preserver-spaces="true">Roof Shapes</span></h3>
<ul>
<li><strong><span data-preserver-spaces="true">Pitched Roof</span></strong><span data-preserver-spaces="true">: Triangular panels joined at the top; adds realism.</span></li>
<li><strong><span data-preserver-spaces="true">Flat Roof</span></strong><span data-preserver-spaces="true">: Simple rectangle; easier for modern-style models.</span></li>
</ul>
<h3><span data-preserver-spaces="true">Adding Details</span></h3>
<ul>
<li><span data-preserver-spaces="true">Use textured paper or cardstock to mimic shingles.</span></li>
<li><span data-preserver-spaces="true">Consider a waterproof coating for durability, especially if displayed outdoors.</span></li>
</ul>
<h2><span data-preserver-spaces="true">Add Windows and Doors</span></h2>
<p><span data-preserver-spaces="true">Windows and doors bring life and personality to your </span><strong><span data-preserver-spaces="true">home build model</span></strong><span data-preserver-spaces="true">.</span></p>
<h3><span data-preserver-spaces="true">Cutting and Framing</span></h3>
<ul>
<li><span data-preserver-spaces="true">Mark openings on walls and cut carefully with a craft knife.</span></li>
<li><span data-preserver-spaces="true">Frame windows with thin cardboard strips.</span></li>
</ul>
<h3><span data-preserver-spaces="true">Glass Effect</span></h3>
<ul>
<li><span data-preserver-spaces="true">Transparency sheets or clear plastic mimic glass.</span></li>
<li><span data-preserver-spaces="true">Attach with white glue for a clean finish.</span></li>
</ul>
<p><strong><span data-preserver-spaces="true">Customization Tip:</span></strong><span data-preserver-spaces="true"> Try different shapes—arched windows for classic homes, square windows for modern designs.</span></p>
<h2><span data-preserver-spaces="true">Interior Detailing</span></h2>
<p><span data-preserver-spaces="true">Creating a captivating interior enhances your </span><strong><span data-preserver-spaces="true">stunning DIY house model</span></strong><span data-preserver-spaces="true">.</span></p>
<h3><span data-preserver-spaces="true">Furnishing</span></h3>
<ul>
<li><span data-preserver-spaces="true">Simple furniture can be made from popsicle sticks or modeling clay.</span></li>
<li><span data-preserver-spaces="true">Paint furniture to match the room colors.</span></li>
</ul>
<h3><span data-preserver-spaces="true">Lighting</span></h3>
<ul>
<li><span data-preserver-spaces="true">Tiny LEDs add realism and highlight interior features.</span></li>
<li><span data-preserver-spaces="true">Plan wiring carefully to keep your model neat.</span></li>
</ul>
<h3><span data-preserver-spaces="true">Tips</span></h3>
<ul>
<li><span data-preserver-spaces="true">Focus on one <a href="https://comeawayhome.co.uk/10-mid-century-modern-bedroom-ideas-for-a-stylish-home/">room</a> at a time to maintain organization.</span></li>
<li><span data-preserver-spaces="true">Keep scale consistent to avoid oversized furniture or accessories.</span></li>
</ul>
<h2><span data-preserver-spaces="true">Exterior Finishing</span></h2>
<p><span data-preserver-spaces="true">The exterior makes your model visually appealing and realistic.</span></p>
<h3><span data-preserver-spaces="true">Wall Texture</span></h3>
<ul>
<li><span data-preserver-spaces="true">Use sandpaper or textured paint for stucco effects.</span></li>
<li><span data-preserver-spaces="true">Apply base colors before adding details.</span></li>
</ul>
<h3><span data-preserver-spaces="true">Landscaping</span></h3>
<ul>
<li><span data-preserver-spaces="true">Tiny trees: twigs or sponges painted green.</span></li>
<li><span data-preserver-spaces="true">Mini lawns: green felt or colored paper.</span></li>
</ul>
<p><strong><span data-preserver-spaces="true">Curb Appeal Tip:</span></strong><span data-preserver-spaces="true"> Adding realistic exteriors increases engagement when showcasing your project online or at school exhibitions.</span></p>
<h2><span data-preserver-spaces="true">Painting and Coloring</span></h2>
<p><span data-preserver-spaces="true">Colors bring your house model to life.</span></p>
<h3><span data-preserver-spaces="true">Base Coat</span></h3>
<ul>
<li><span data-preserver-spaces="true">Apply a single color to the walls and roof first.</span></li>
<li><span data-preserver-spaces="true">Use light, even strokes to prevent streaks.</span></li>
</ul>
<h3><span data-preserver-spaces="true">Adding Depth</span></h3>
<ul>
<li><span data-preserver-spaces="true">Layer different shades for shadows and highlights.</span></li>
<li><span data-preserver-spaces="true">Seal paint with a matte or gloss varnish to protect your work.</span></li>
</ul>
<h3><span data-preserver-spaces="true">Color Theory</span></h3>
<ul>
<li><span data-preserver-spaces="true">Complementary colors for contrast.</span></li>
<li><span data-preserver-spaces="true">Warm tones create a cozy look; cool tones give a modern feel.</span></li>
</ul>
<h2><span data-preserver-spaces="true">Assemble and Secure</span></h2>
<p><span data-preserver-spaces="true">Now, join all parts permanently.</span></p>
<h3><span data-preserver-spaces="true">Step-by-Step Assembly</span></h3>
<ol>
<li><span data-preserver-spaces="true">Attach the <a href="https://comeawayhome.co.uk/during-a-roof-replacement-do-i-need-to-stay-home/">roof</a> to the walls using strong glue.</span></li>
<li><span data-preserver-spaces="true">Double-check window and door alignment.</span></li>
<li><span data-preserver-spaces="true">Reinforce weak areas with extra tape or cardboard.</span></li>
</ol>
<h2><span data-preserver-spaces="true">Display and Showcase</span></h2>
<p><span data-preserver-spaces="true">Finally, present your </span><strong><span data-preserver-spaces="true">DIY home model beautifully at home</span></strong><span data-preserver-spaces="true">.</span></p>
<h3><span data-preserver-spaces="true">Display Tips</span></h3>
<ul>
<li><span data-preserver-spaces="true">Mount the model on a sturdy stand or baseboard.</span></li>
<li><span data-preserver-spaces="true">Add a mini plaque with the model name or creator info.</span></li>
</ul>
<h3><span data-preserver-spaces="true">Photography Tips</span></h3>
<ul>
<li><span data-preserver-spaces="true">Natural lighting highlights colors and textures.</span></li>
<li><span data-preserver-spaces="true">Use close-ups for interiors and wide shots for exteriors.</span></li>
</ul>
<p><span data-preserver-spaces="true">Encourage family or classmates to admire and share your creation. A well-photographed model can even inspire others to start their projects.</span></p>
<h2><span data-preserver-spaces="true">Common Mistakes to Avoid</span></h2>
<p><span data-preserver-spaces="true">Even experienced builders face pitfalls. Here are the most common:</span></p>
<ul>
<li><strong><span data-preserver-spaces="true">Weak joints</span></strong><span data-preserver-spaces="true">: Reinforce corners and edges.</span></li>
<li><strong><span data-preserver-spaces="true">Uneven cuts</span></strong><span data-preserver-spaces="true"> – Always measure and cut carefully.</span></li>
<li><strong><span data-preserver-spaces="true">Mismatched scale</span></strong><span data-preserver-spaces="true"> – Keep consistent ratios for furniture, windows, and rooms.</span></li>
</ul>
<h2><span data-preserver-spaces="true">Variations and Advanced Ideas</span></h2>
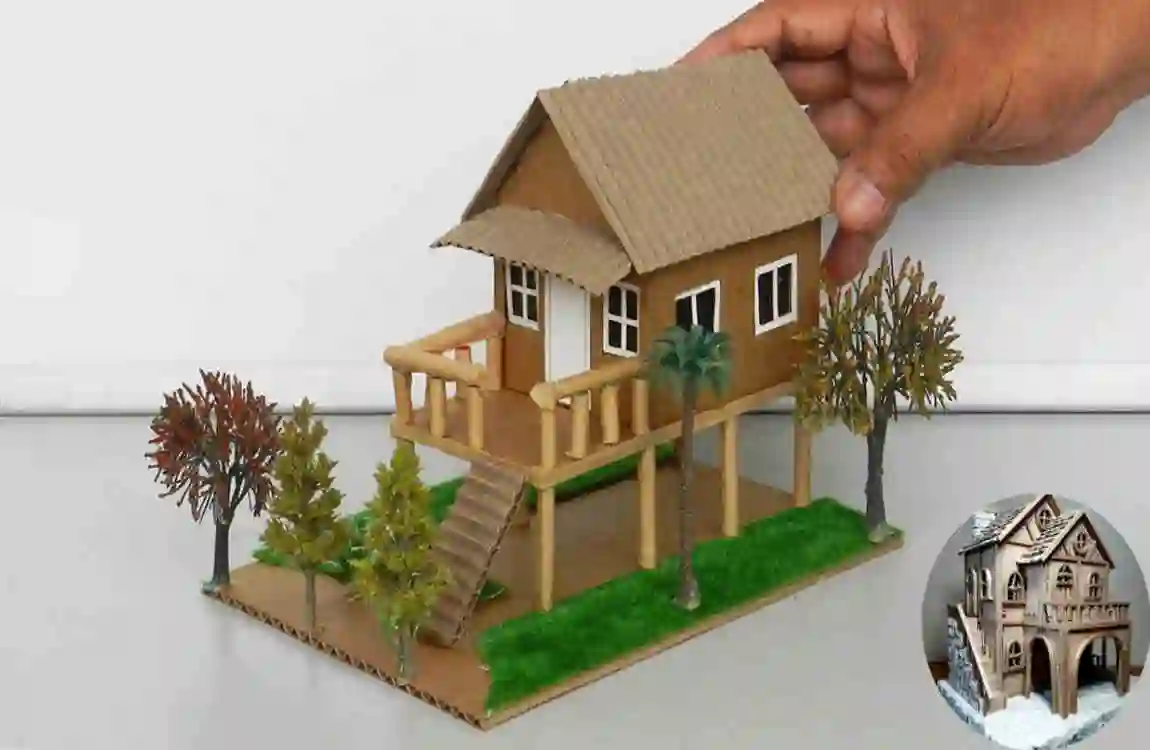
<p><img class="alignnone wp-image-6757 size-full" src="https://comeawayhome.co.uk/wp-content/uploads/2026/04/Untitleddesign82_imresizer-ezgif.com-jpg-to-webp-converter.webp" alt="Stunning DIY House Model at Home" width="1150" height="750" /></p>
<p><span data-preserver-spaces="true">For experienced hobbyists:</span></p>
<ul>
<li><strong><span data-preserver-spaces="true">Multi-story models</span></strong><span data-preserver-spaces="true"> – Add staircases and multiple levels.</span></li>
<li><strong><span data-preserver-spaces="true">Eco-friendly houses</span></strong><span data-preserver-spaces="true"> – Recycle cardboard, paper, and fabric.</span></li>
<li><strong><span data-preserver-spaces="true">Modern tiny homes</span></strong><span data-preserver-spaces="true"> – Explore trends in sustainable and modular living.</span></li>
</ul>
<p><span data-preserver-spaces="true">In 2026, sustainability trends are inspiring miniature models that are not just beautiful but environmentally conscious.</span></p>
<h3><strong>How to Make Model of House – FAQ (Short Version)</strong></h3>
<p><strong>What materials do I need to make a house model?</strong><br />
A: Basic supplies include cardboard or foam board, glue, craft knife, ruler, paints, brushes, and optional items like LED lights or mini furniture.</p>
<p><strong>How do I start building a house model?</strong><br />
A: Begin with a simple <strong>plan or blueprint</strong>, decide the scale, and sketch the layout of rooms, doors, and windows.</p>
<p><strong>What’s the easiest way to cut walls and roof?</strong><br />
A: Use a <strong>craft knife and ruler</strong> for straight cuts, and score cardboard for foldable doors or windows.</p>
<p><strong>How do I make windows and doors realistic?</strong><br />
A: Cut openings, frame them with thin cardboard, and use <strong>clear plastic sheets</strong> to mimic glass.</p>
<p><strong>Can I add interior details?</strong><br />
A: Yes! Craft furniture from popsicle sticks or clay, and add tiny lights for a realistic look.</p>
<p><strong>How should I paint my house model?</strong><br />
A: Start with a <strong>base coat</strong>, layer colors for depth, and seal with varnish for durability.</p>
<p><strong>How do I prevent my model from collapsing?</strong><br />
A: Reinforce corners with glue or tape and allow each section to dry before assembly.</p>
<p><strong>Any tips for displaying my model?</strong><br />
A: Mount on a sturdy base, add signage, and photograph in natural light to showcase details.</p>
<p><strong>Common mistakes to avoid?</strong><br />
A: Uneven cuts, weak joints, and mismatched scale. Measure twice, cut once, and use quality materials.</p>
<p><strong>Can I make advanced or eco-friendly versions?</strong><br />
A: Yes! Try multi-story models, use recycled materials, or design tiny sustainable homes.</p>
Creating a DIY house model is more than just a craft—it’s a creative journey that combines imagination, precision, and hands-on skills. Whether you are a student working on a school project, an architecture enthusiast, or simply looking for a fun home activity, learning how to make a model of a house can be both satisfying and educational. Miniature models offer a unique way to visualize architectural ideas, test layouts, and even decorate your space with something personal and handcrafted.
DIY house models are trending for several reasons. Many hobbyists love the sense of accomplishment from building a scale model house. At the same time, educators find it an excellent teaching tool for geometry, design, and spatial planning. Additionally, creating your model at home offers opportunities for customization, cost savings, and even for creatively recycling old materials.
Materials Needed
Before you start building, gather your supplies. Keeping materials affordable and accessible is key, especially if you’re building your DIY house model at home.
Essential Supplies
- Cardboard or foam board – Ideal for walls, roof, and base; lightweight yet sturdy.
- Craft knife, ruler, cutting mat – Ensures clean, accurate cuts for professional results.
- Glue gun, white glue, tape – For assembling walls and securing decorations.
- Acrylic paints, markers, brushes – Add color, texture, and character.
- Optional items: small LED lights, fabric for curtains, miniature furniture kits.
plan Your Design
The first step in building a house model is planning. A solid blueprint ensures your model will be realistic and well-proportioned.
Choosing the Scale
Decide on the scale of your model. A 1:50 ratio is common, meaning 1 cm on the model represents 50 cm in real life. Scale consistency helps when adding furniture, windows, and landscaping.
Sketching Your Layout
- Draw your floor plan on graph paper.
- Mark walls, doors, windows, and room divisions.
- Decide on architectural style—modern, traditional, or minimalist.
Beginner tip: Free online tools like SketchUp or Floorplanner help visualize your model digitally before cutting materials.
Measure and Cut the Base
A solid foundation is crucial for a stable model. The base acts like the “ground” your house will stand on.
Cutting the Base
- Choose foam board for durability.
- Measure your dimensions carefully using a ruler.
- Cut a rectangular shape representing the footprint of your house.
Adding Realism
- Include pathways or garden space in the base measurements.
- Draw grid lines lightly on the base to guide wall placement.
Example Table – Base Measurements for Different House Sizes
House TypeBase LengthBase WidthRecommended Scale
Small Cottage 20 cm 15 cm 1:50
Medium Home 30 cm 25 cm 1:50
Large Villa 50 cm 40 cm 1:50
Build the Walls
With the base ready, it’s time to construct walls. This step defines the shape and structure of your model.
Assembling Vertical Panels
- Cut cardboard or foam board into panels for each wall.
- Use a craft knife and ruler for precise edges.
- Score and fold sections for doors or windows.
Securing Walls
- Apply glue along the edges and press firmly onto the base.
- Reinforce corners with extra tape or cardboard strips for stability.
Construct the Roof
The roof is a defining feature of any house model.
Roof Shapes
- Pitched Roof: Triangular panels joined at the top; adds realism.
- Flat Roof: Simple rectangle; easier for modern-style models.
Adding Details
- Use textured paper or cardstock to mimic shingles.
- Consider a waterproof coating for durability, especially if displayed outdoors.
Add Windows and Doors
Windows and doors bring life and personality to your home build model.
Cutting and Framing
- Mark openings on walls and cut carefully with a craft knife.
- Frame windows with thin cardboard strips.
Glass Effect
- Transparency sheets or clear plastic mimic glass.
- Attach with white glue for a clean finish.
Customization Tip: Try different shapes—arched windows for classic homes, square windows for modern designs.
Interior Detailing
Creating a captivating interior enhances your stunning DIY house model.
Furnishing
- Simple furniture can be made from popsicle sticks or modeling clay.
- Paint furniture to match the room colors.
Lighting
- Tiny LEDs add realism and highlight interior features.
- Plan wiring carefully to keep your model neat.
Tips
- Focus on one room at a time to maintain organization.
- Keep scale consistent to avoid oversized furniture or accessories.
Exterior Finishing
The exterior makes your model visually appealing and realistic.
Wall Texture
- Use sandpaper or textured paint for stucco effects.
- Apply base colors before adding details.
Landscaping
- Tiny trees: twigs or sponges painted green.
- Mini lawns: green felt or colored paper.
Curb Appeal Tip: Adding realistic exteriors increases engagement when showcasing your project online or at school exhibitions.
Painting and Coloring
Colors bring your house model to life.
Base Coat
- Apply a single color to the walls and roof first.
- Use light, even strokes to prevent streaks.
Adding Depth
- Layer different shades for shadows and highlights.
- Seal paint with a matte or gloss varnish to protect your work.
Color Theory
- Complementary colors for contrast.
- Warm tones create a cozy look; cool tones give a modern feel.
Assemble and Secure
Now, join all parts permanently.
Step-by-Step Assembly
- Attach the roof to the walls using strong glue.
- Double-check window and door alignment.
- Reinforce weak areas with extra tape or cardboard.
Display and Showcase
Finally, present your DIY home model beautifully at home.
Display Tips
- Mount the model on a sturdy stand or baseboard.
- Add a mini plaque with the model name or creator info.
Photography Tips
- Natural lighting highlights colors and textures.
- Use close-ups for interiors and wide shots for exteriors.
Encourage family or classmates to admire and share your creation. A well-photographed model can even inspire others to start their projects.
Common Mistakes to Avoid
Even experienced builders face pitfalls. Here are the most common:
- Weak joints: Reinforce corners and edges.
- Uneven cuts – Always measure and cut carefully.
- Mismatched scale – Keep consistent ratios for furniture, windows, and rooms.
Variations and Advanced Ideas

For experienced hobbyists:
- Multi-story models – Add staircases and multiple levels.
- Eco-friendly houses – Recycle cardboard, paper, and fabric.
- Modern tiny homes – Explore trends in sustainable and modular living.
In 2026, sustainability trends are inspiring miniature models that are not just beautiful but environmentally conscious.
How to Make Model of House – FAQ (Short Version)
What materials do I need to make a house model?
A: Basic supplies include cardboard or foam board, glue, craft knife, ruler, paints, brushes, and optional items like LED lights or mini furniture.
How do I start building a house model?
A: Begin with a simple plan or blueprint, decide the scale, and sketch the layout of rooms, doors, and windows.
What’s the easiest way to cut walls and roof?
A: Use a craft knife and ruler for straight cuts, and score cardboard for foldable doors or windows.
How do I make windows and doors realistic?
A: Cut openings, frame them with thin cardboard, and use clear plastic sheets to mimic glass.
Can I add interior details?
A: Yes! Craft furniture from popsicle sticks or clay, and add tiny lights for a realistic look.
How should I paint my house model?
A: Start with a base coat, layer colors for depth, and seal with varnish for durability.
How do I prevent my model from collapsing?
A: Reinforce corners with glue or tape and allow each section to dry before assembly.
Any tips for displaying my model?
A: Mount on a sturdy base, add signage, and photograph in natural light to showcase details.
Common mistakes to avoid?
A: Uneven cuts, weak joints, and mismatched scale. Measure twice, cut once, and use quality materials.
Can I make advanced or eco-friendly versions?
A: Yes! Try multi-story models, use recycled materials, or design tiny sustainable homes.